
1. Overview
This codelab guides you through the process of integrating Firebase Data Connect with a Cloud SQL database to build a movie review app for iOS using SwiftUI
You will learn how to connect your iOS application to a Cloud SQL database using Firebase Data Connect, enabling seamless data synchronization for movie reviews.
By the end of this codelab, you will have a functional iOS app that allows users to browse movies, and mark movies as favourites, all backed by a Cloud SQL database using the power of Firebase Data Connect.
What you'll learn
This codelab will teach you how to:
- Set up Firebase Data Connect, using the Firebase Emulator suite for quick turn-around times.
- Design a database schema using Data Connect and GraphQL.
- Create a typesafe Swift SDK from your database schema and add it to a Swift application.
- Implement user authentication and integrate it with Firebase Data Connect to secure your users' data.
- Retrieve, update, delete, and manage data in Cloud SQL using queries and mutations powered by GraphQL.
- (Optionally) Deploy a Data Connect service to production.
Prerequisites
- The latest version of Xcode
- The codelab sample code. You will download the sample code in one of the first steps of the codelab.
2. Set up the sample project
Create a Firebase project
- Sign into the Firebase console using your Google Account.
- Click the button to create a new project, and then enter a project name (for example,
Friendly Flix).
- Click Continue.
- If prompted, review and accept the Firebase terms, and then click Continue.
- (Optional) Enable AI assistance in the Firebase console (called "Gemini in Firebase").
- For this codelab, you do not need Google Analytics, so toggle off the Google Analytics option.
- Click Create project, wait for your project to provision, and then click Continue.
Download the code
Run the following command to clone the sample code for this codelab. This will create a directory called codelab-dataconnect-ios on your machine:
git clone https://github.com/FirebaseExtended/codelab-dataconnect-ios`
If you don't have git on your machine, you can also download the code directly from GitHub.
Add Firebase configuration
The Firebase SDK uses a configuration file to connect to your Firebase project. On Apple platforms, this file is called GoogleServices-Info.plist. In this step, you will download the configuration file and add it to your Xcode project.
- In the Firebase console, select Project Overview in the left nav.
- Click the iOS+ button to select the platform. When prompted for the Apple bundle ID, use
com.google.firebase.samples.FriendlyFlix - Click Register app and follow the instructions to download the
GoogleServices-Info.plistfile. - Move the downloaded file into the
start/FriendlyFlix/app/FriendlyFlix/FriendlyFlix/directory of the code you just downloaded, replacing the existingGoogleServices-Info.plistfile. - Then click Next a couple of times to complete the setup project in the Firebase console (you don't need to add the SDK to the app, as this has already been taken care of for you in the starter project).
- Finally, click on Continue to console to finish the setup process.
3. Set up Data Connect
Installation
Auto installation
Run the following command in the codelab-dataconnect-ios/FriendlyFlix directory:
curl -sL https://firebase.tools/dataconnect | bash
This script tries to set up the development environment for you and launch a browser-based IDE. This IDE provides toolings, including a pre-bundled VS Code extension, to help you manage your schema and define queries and mutations to be used in your application, and generate strongly-typed SDKs.
After running the script, VS Code should open automatically.
After you've done this once, you can then start VS Code by running VS Code in the local directory:
code .
Manual installation
- Install Visual Studio Code
- Install Node.js
- In VS Code, open the
codelab-dataconnect-ios/FriendlyFlixdirectory. - Install the Firebase Data Connect extension from the Visual Studio Code Marketplace.
Initialize Data Connect in the project
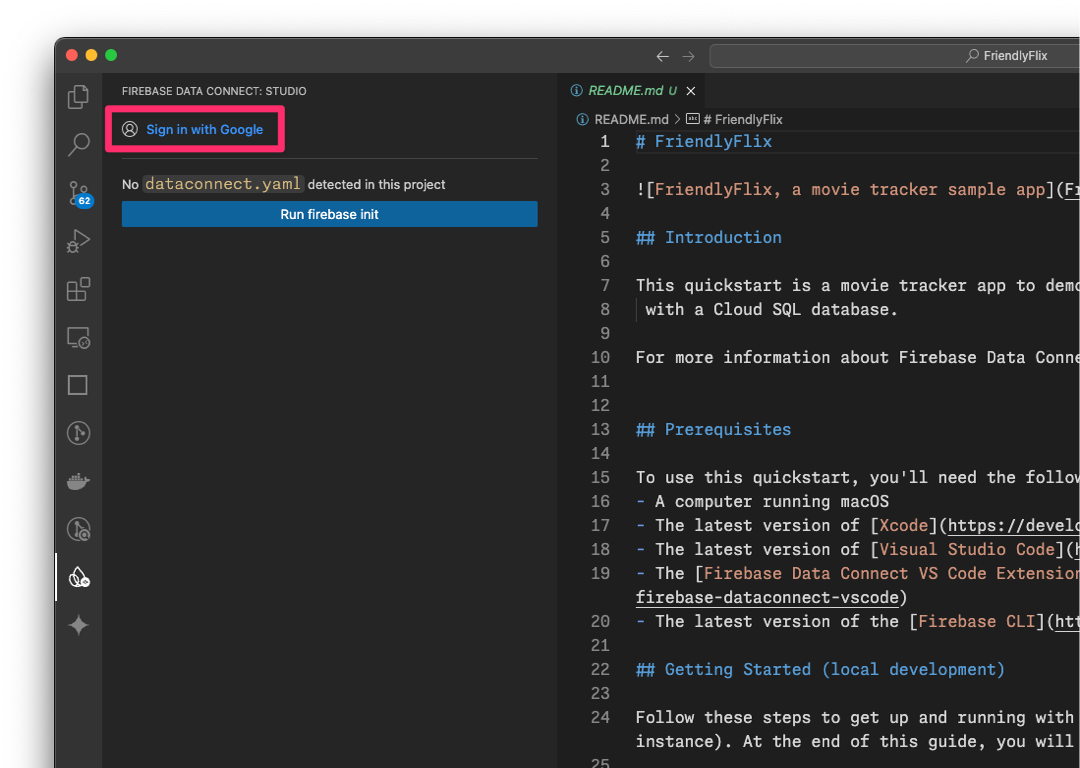
In the left-hand panel, click the Firebase icon to open the Data Connect VS Code extension UI
- Click the Sign in with Google button. A browser window will open; follow the instructions to sign in to the extension with your Google account.
- Click the Connect a Firebase project button and select the project you created earlier in the console.
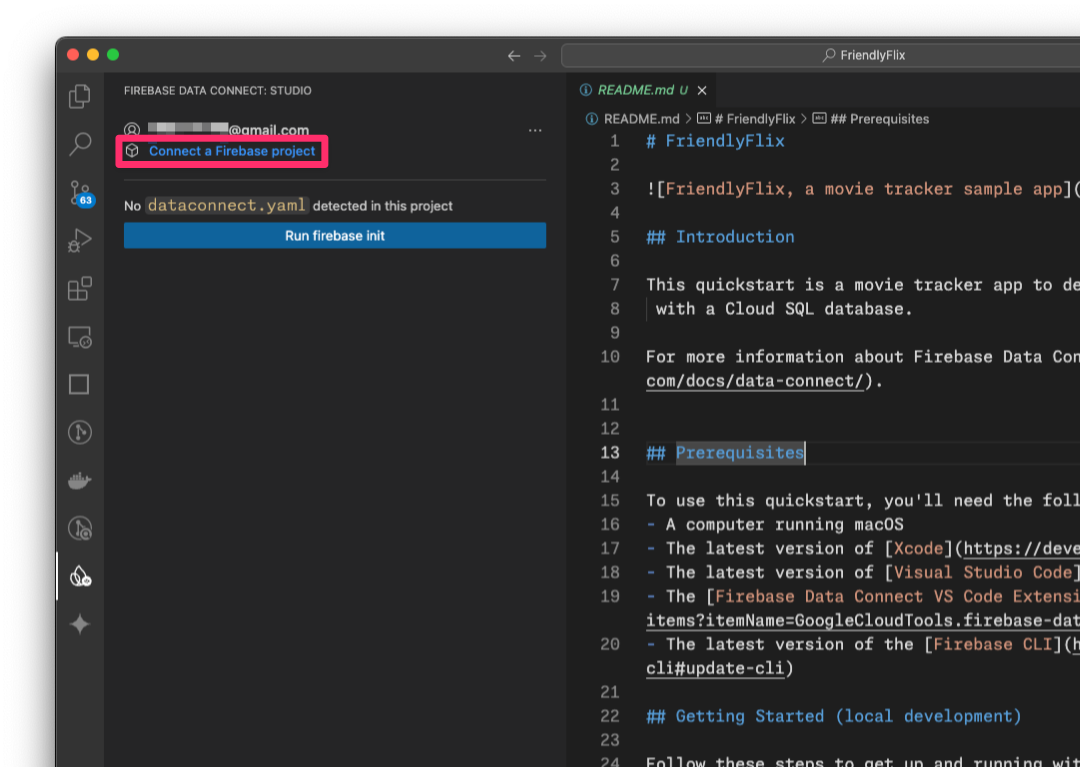
- Click the Run firebase init button and follow the steps in the integrated terminal.
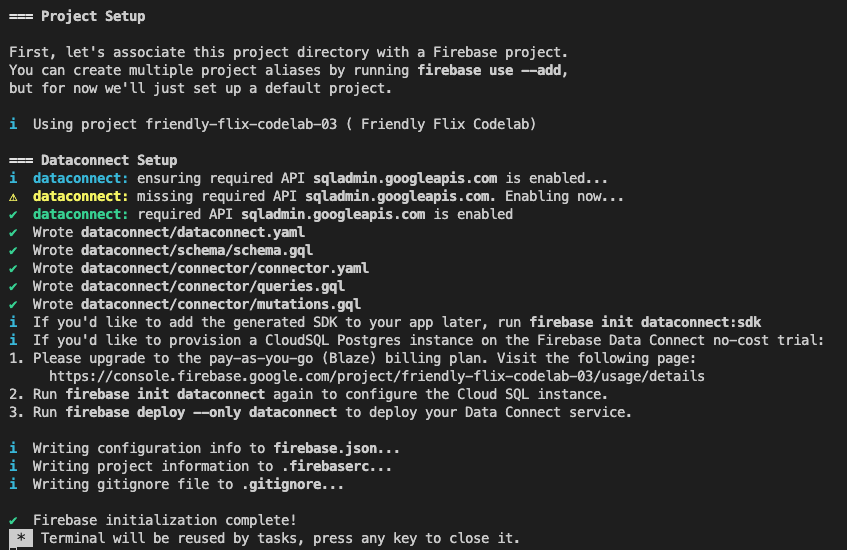
Configure SDK generation
Once you click on the Run firebase init button, the Firebase Data Connect extension should initialize a dataconnect directory for you.
In VS Code, open the dataconnect/connector/connector.yaml file and you will find the default configuration.
Please update the configuration and use the following settings to make sure the generated code works with this codelab. Specifically, make sure that the connectorId is set to friendly-flix, and the Swift package to FriendlyFlixSDK.
connectorId: "friendly-flix"
generate:
  swiftSdk:
    outputDir: "../../app"
    package: "FriendlyFlixSDK"
    observablePublisher: observableMacro
Here is what these settings mean:
connectorId- a unique name for this connector.outputDir- path where the generated Data Connect SDK will be stored. This path is relative to the directory containing theconnector.yamlfile.package- the package name to be used for the generated Swift package.
Once you save this file, Firebase Data Connect will generate a Swift package named FriendlyFlixSDK for you, and place it next to the FriendlyFlix project folder.
Start the Firebase emulators
In VS Code, switch to the Firebase view, and then click the Start emulators button.

This will start the Firebase Emulator in the integrated terminal. The output should look like this:
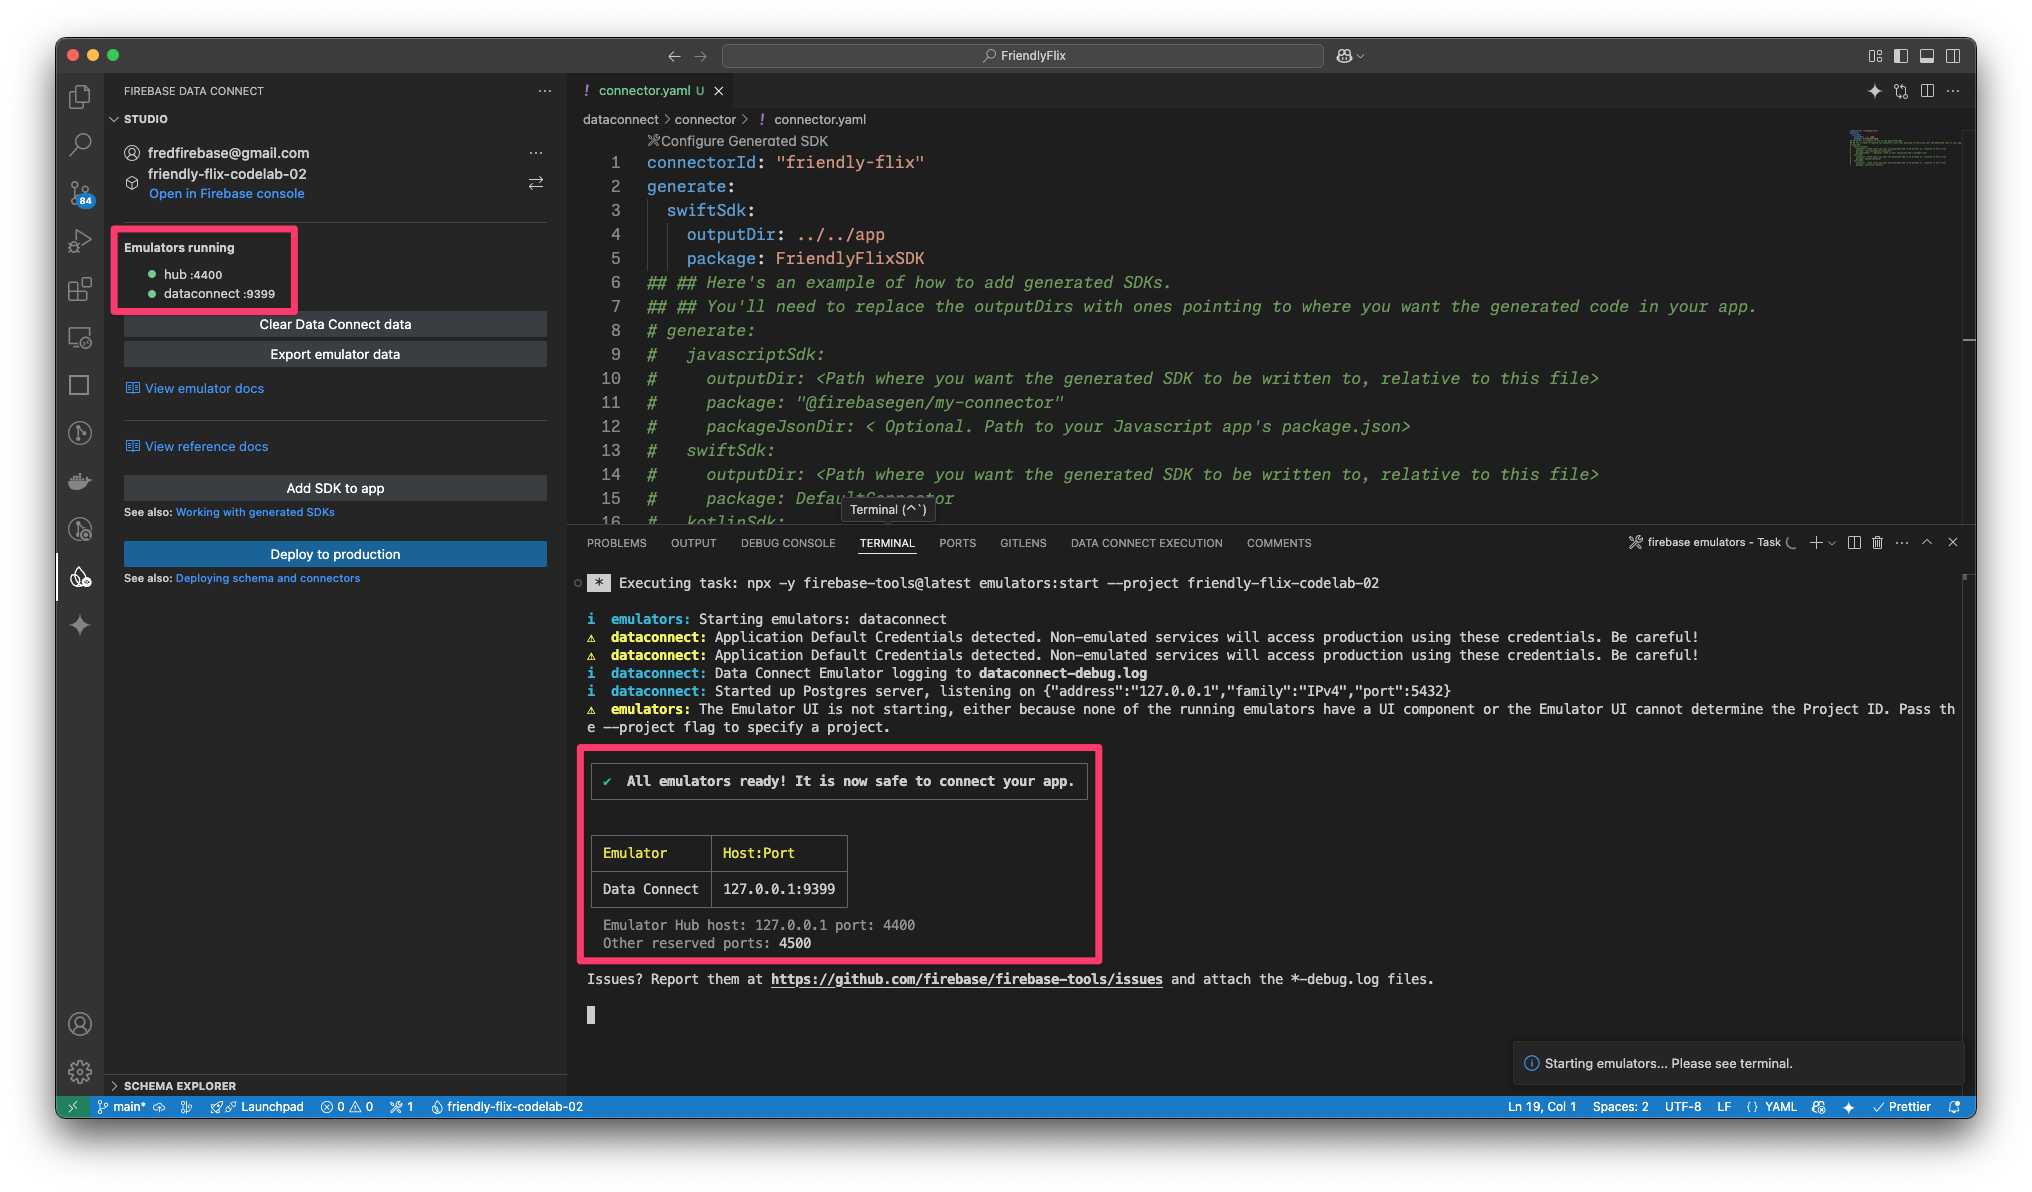
npx -y firebase-tools@latest emulators:start --project <your-project-id>
Add the generated package to your Swift app
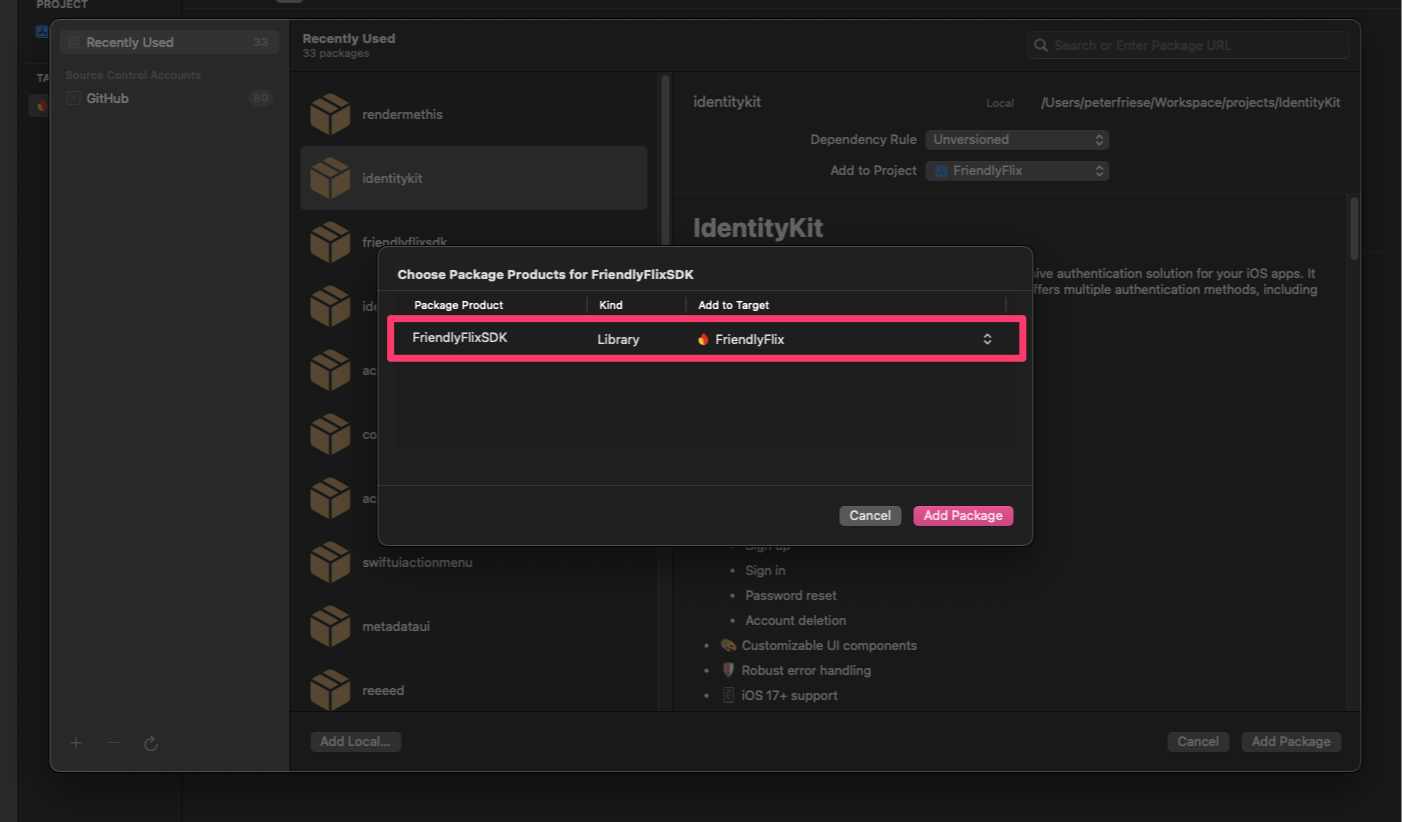
- Open
FriendlyFlix/app/FriendlyFlix/FriendlyFlix.xcodeprojin Xcode - Select File > Add Package Dependencies...
- Click on Add Local..., then add the
FriendlyFlixSDKpackage from theFriendlyFlix/appfolder - Wait for Xcode to resolve the package dependencies.
- In the Choose Package Products for FriendlyFlixSDK dialog, select
FriendlyFlixas the target, and click Add Package.
Configure the iOS app to use the local emulator
- Open
FriendlyFlixApp.swift. (You can press CMD + Shift + O to open the Quick Open dialog, and then type "FriendlyFlixApp" to quickly find the file) - Import Firebase, Firebase Auth, Firebase Data Connect, and the generated SDK for your schema
- In the initialiser, configure Firebase.
- Make sure DataConnect and Firebase Auth use the local emulator.
import SwiftUI
import os
import Firebase
import FirebaseAuth
import FriendlyFlixSDK
import FirebaseDataConnect

@main
struct FriendlyFlixApp: App {
  ...

  init() {
    FirebaseApp.configure()
    if useEmulator {
      DataConnect.friendlyFlixConnector.useEmulator(port: 9399)
      Auth.auth().useEmulator(withHost: "localhost", port: 9099)
    }

    authenticationService = AuthenticationService()
  }

  ...

}
- Select an iOS Simulator in the Destination dropdown.
- Press CMD+R (or click on the Run button) in Xcode to run the app on a Simulator.
4. Define the schema and pre-populate the database
In this section, you'll define the structure and relationships between the key entities in the movie application in a schema. Entities such as Movie, MovieMetaData, and others are mapped to database tables, with relationships established using Firebase Data Connect and GraphQL schema directives.
Core Entities and Relationships
The data model for this movie tracker app consists of several entities which you will create over the course of this codelab. You will create the core entities first, and - as you implement more and more features - you will add the entities required for those features.
In this step, you will create the Movie and MovieMetadata types.
Movie
The Movie type defines the main structure for a movie entity, including fields like title, genre, releaseYear, and rating.
In VS Code, add the Movie type definition to dataconnect/schema/schema.gql:
type Movie @table {
  id: UUID! @default(expr: "uuidV4()")
  title: String!
  imageUrl: String!
  releaseYear: Int
  genre: String
  rating: Float
  description: String
  tags: [String]
}
MovieMetadata
The MovieMetadata type establishes a one-to-one relationship with the Movie type. It includes additional data such as the movie's director.
Add the MovieMetadata table definition to the dataconnect/schema/schema.gql file:
type MovieMetadata @table {
  movie: Movie! @ref
  director: String
}
Auto-Generated Fields and Defaults
The schema uses expressions like @default(expr: "uuidV4()") to automatically generate unique IDs and timestamps. For instance, the id field in the Movie type is automatically populated with a UUID when a new record is created.
Insert mock data for movies and movie metadata
With the schema defined, you can now pre-populate the database with mock data for testing.
- In Finder, copy
finish/FriendlyFlix/dataconnect/moviedata_insert.gqlto thestart/FriendlyFlix/dataconnectfolder. - In VS Code, open
dataconnect/moviedata_insert.gql. - Ensure the emulators in the Firebase Data Connect extension are running.
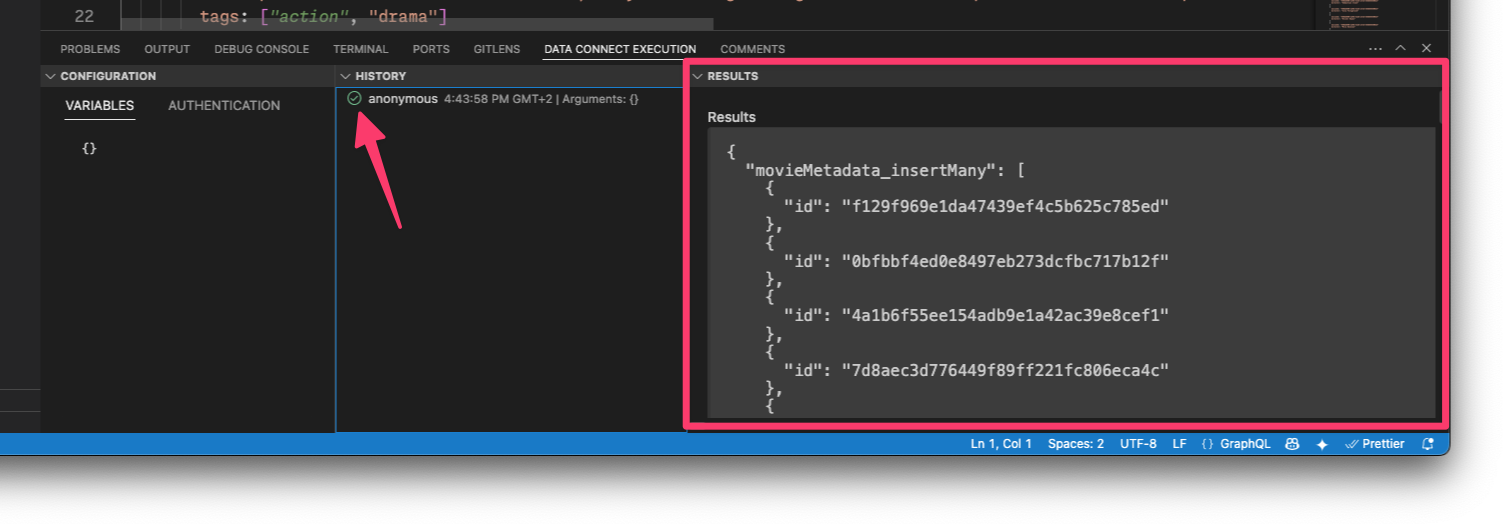
- You should see a Run (local) button at the top of the file. Click this to insert the mock movie data into your database.
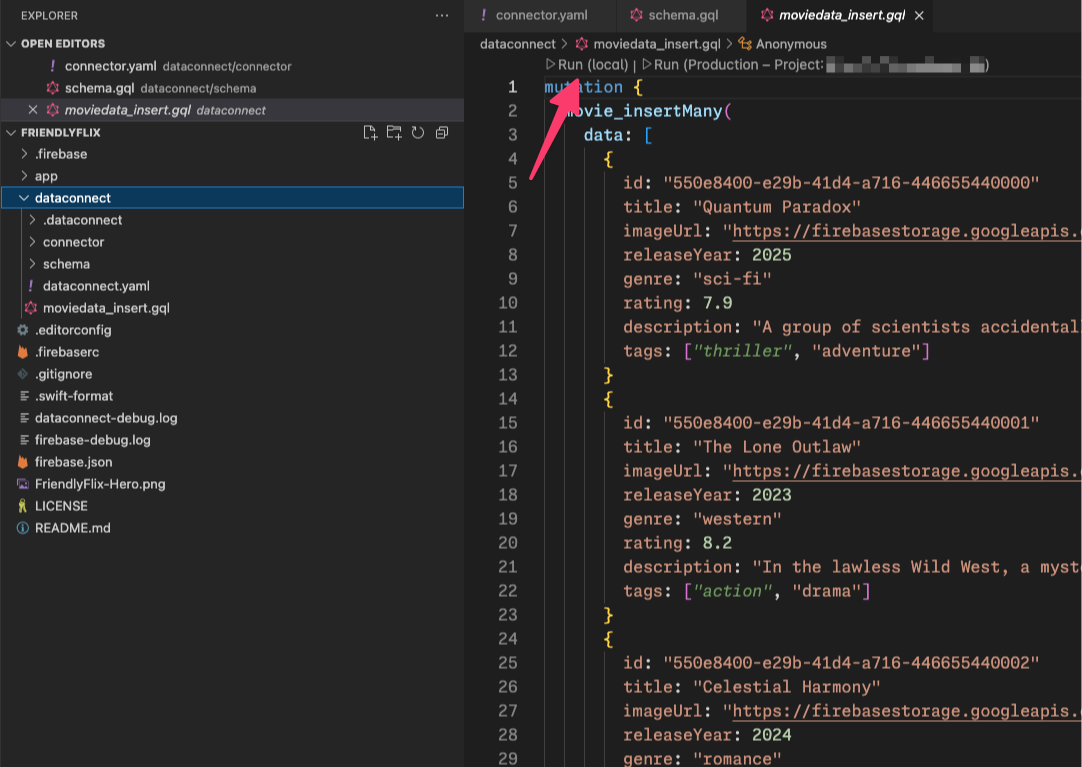
- Check the Data Connect Execution terminal to confirm that the data was added successfully.
With the data in place, proceed to the next step to learn how to create queries in Data Connect.
5. Retrieve and display movies
In this section, you will implement a feature for displaying a list of movies.
First, you will learn how to create a query that retrieves all movies from the movies table. Firebase Data Connect generates code for a typesafe SDK that you can then use to execute the query and display the retrieved movies in your app's UI.
Define the ListMovies query
Queries in Firebase Data Connect are written in GraphQL, allowing you to specify which fields to fetch. In FriendlyFlix, the screens that display movies require the following fields: title, description, releaseYear, rating, and imageUrl. In addition, since this is a SwiftUI app, you will need the id to help with SwiftUI view identity.
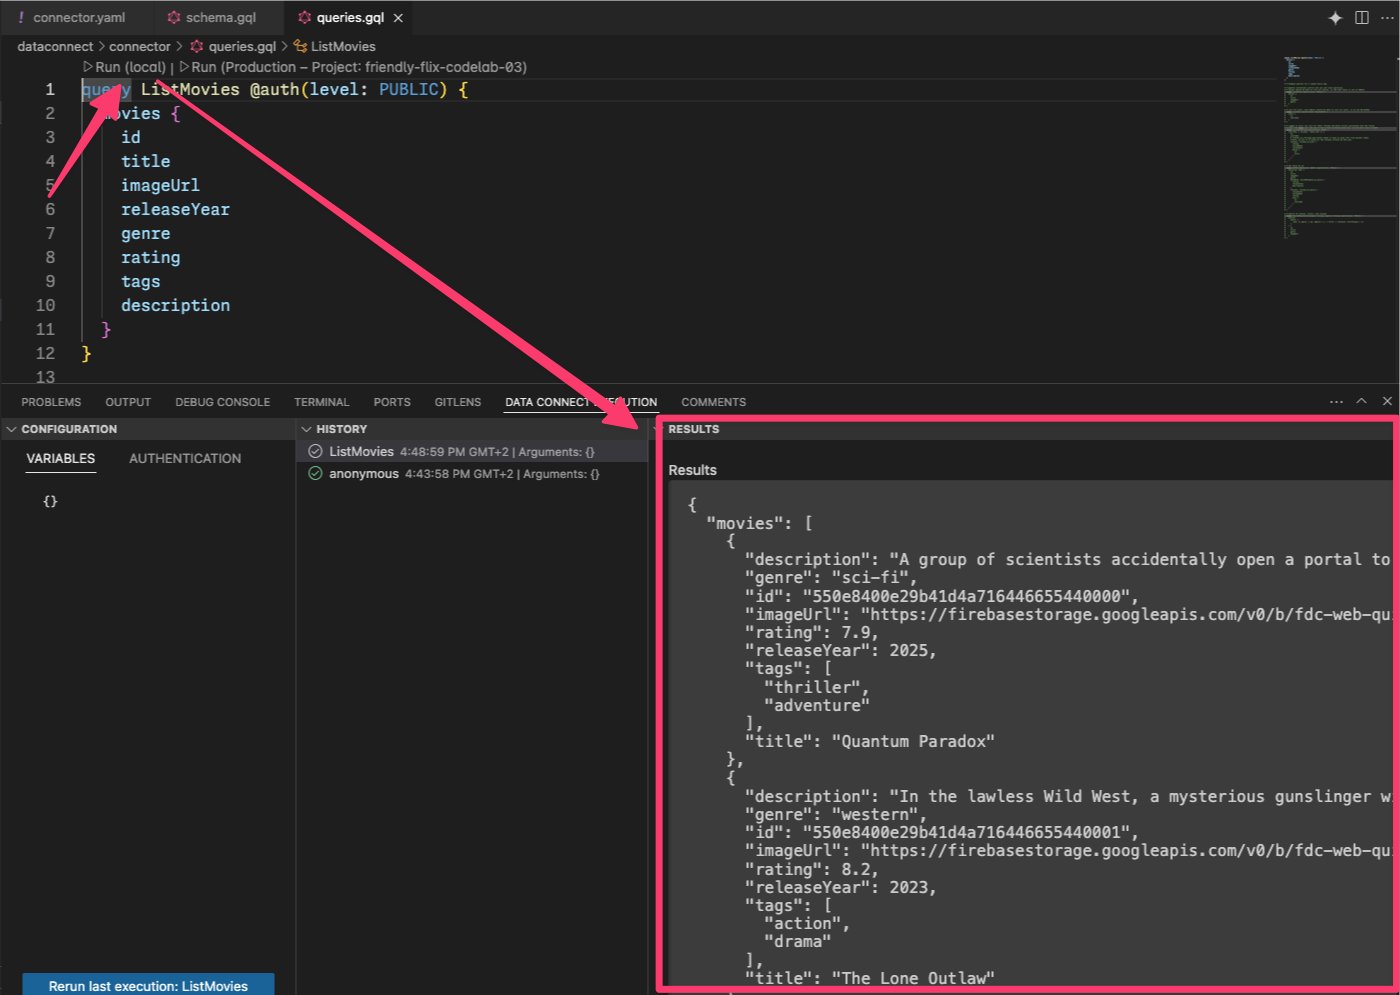
In VS Code, open the dataconnect/connector/queries.gql file and add the ListMovies query:
query ListMovies @auth(level: PUBLIC) {
  movies {
    id
    title
    imageUrl
    releaseYear
    genre
    rating
    tags
    description
  }
}
To test the new query, click the Run (local) button to execute the query against your local database. The list of movies from the database should be displayed under the Results section of the Data Connect Execution terminal.
Connect the ListMovies query to the app's home screen
Now that you've tested the query in the Data Connect Emulator, you can call the query from inside your app.
When you save queries.gql, Firebase Data Connect generates the code corresponding to the ListMovies query in the FriendlyFlixSDK package.
In Xcode, open Movie+DataConnect.swift, and add the following code to map from ListMoviesQuery.Data.Movie to Movie:
import FirebaseDataConnect
import FriendlyFlixSDK

extension Movie {
  init(from: ListMoviesQuery.Data.Movie) {
    id = from.id
    title = from.title
    description = from.description ?? ""
    releaseYear = from.releaseYear
    rating = from.rating
    imageUrl = from.imageUrl
  }
}
Open the HomeScreen.swift file and update it using the following code snippet.
import SwiftUI
import FirebaseDataConnect
import FriendlyFlixSDK

struct HomeScreen: View {
  ...

  private var connector = DataConnect.friendlyFlixConnector
  let heroMoviesRef: QueryRefObservation<ListMoviesQuery.Data, ListMoviesQuery.Variables>

  init() {
    heroMoviesRef = connector.listMoviesQuery.ref()
  }
}

extension HomeScreen {
  ...

  private var heroMovies: [Movie] {
    heroMoviesRef.data?.movies.map(Movie.init) ?? []
  }

 private var topMovies: [Movie] {
    heroMoviesRef.data?.movies.map(Movie.init) ?? []
  }

  private var watchList: [Movie] {
    heroMoviesRef.data?.movies.map(Movie.init) ?? []
  }

  ...
}
The |
Run the app
In Xcode, click on the Run button to launch the app in the iOS Simulator.
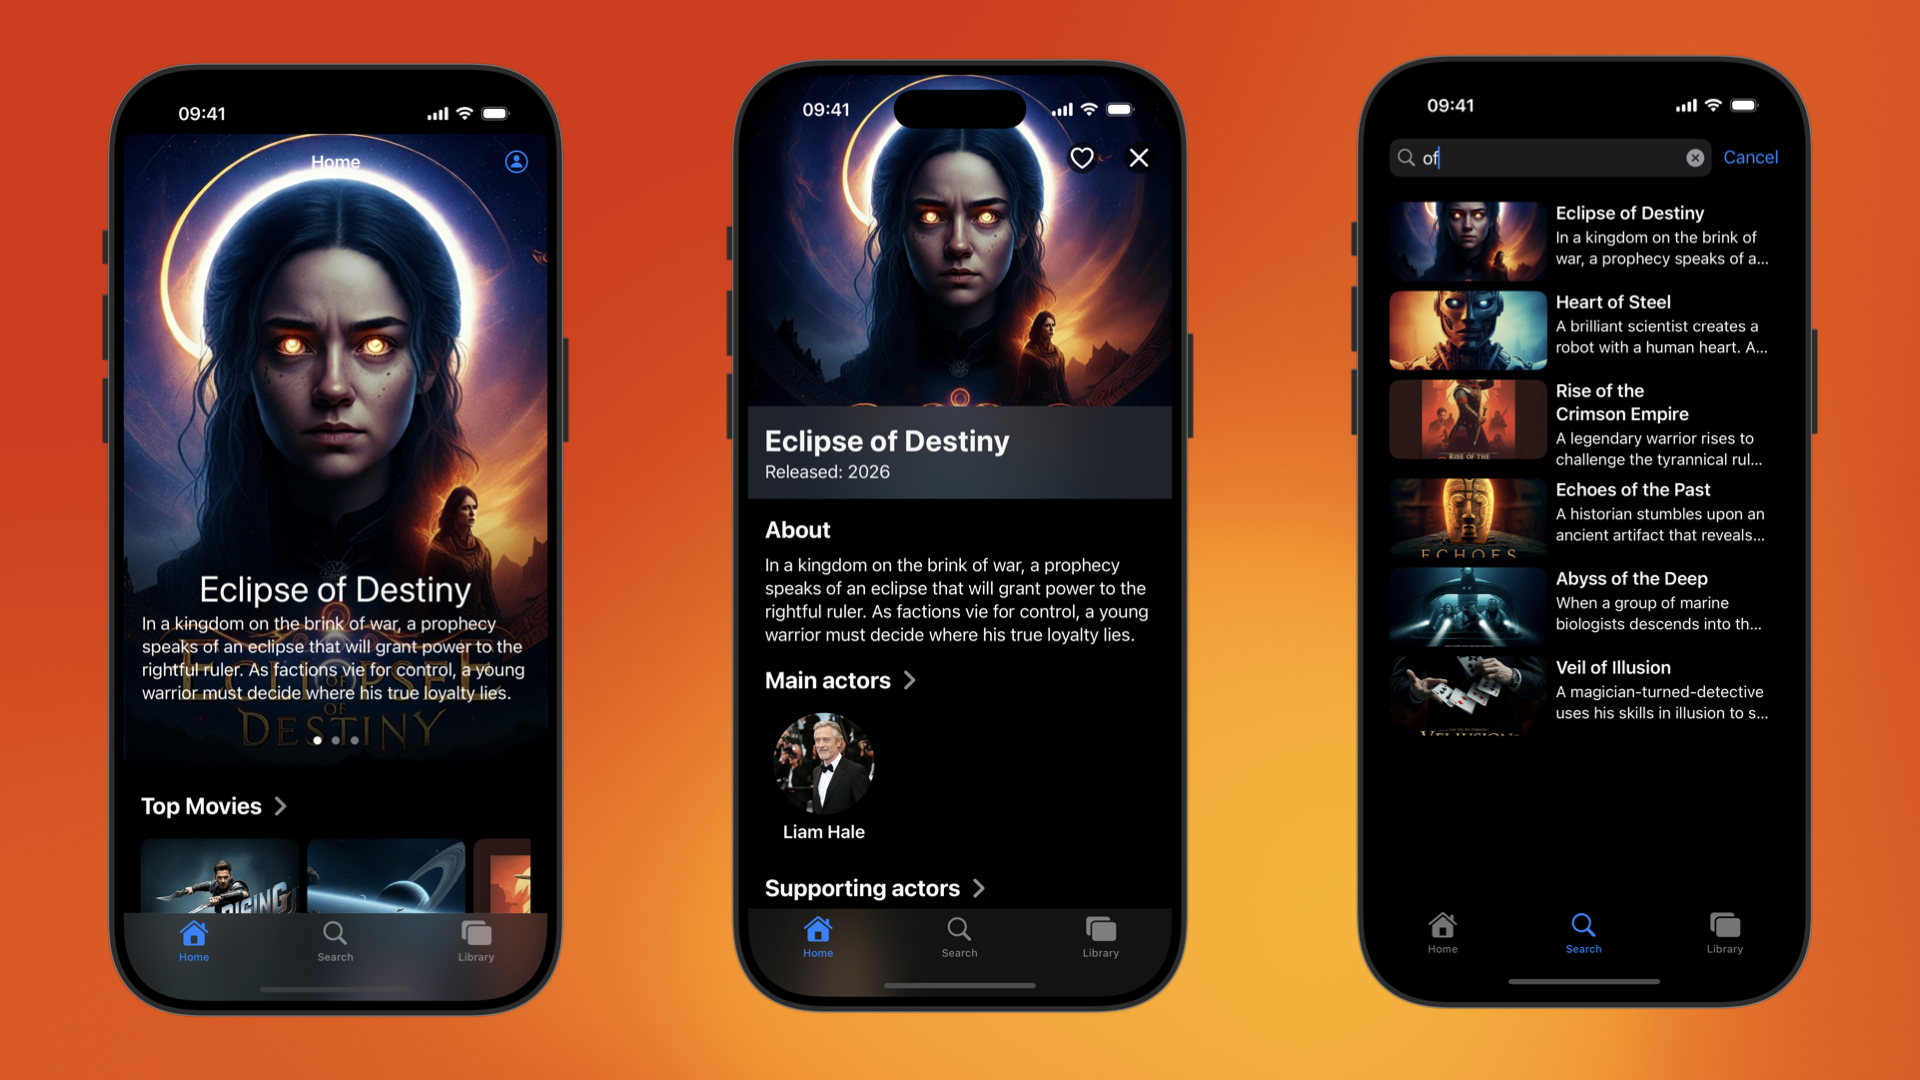
Once the app launches, you should see a screen that looks like this:
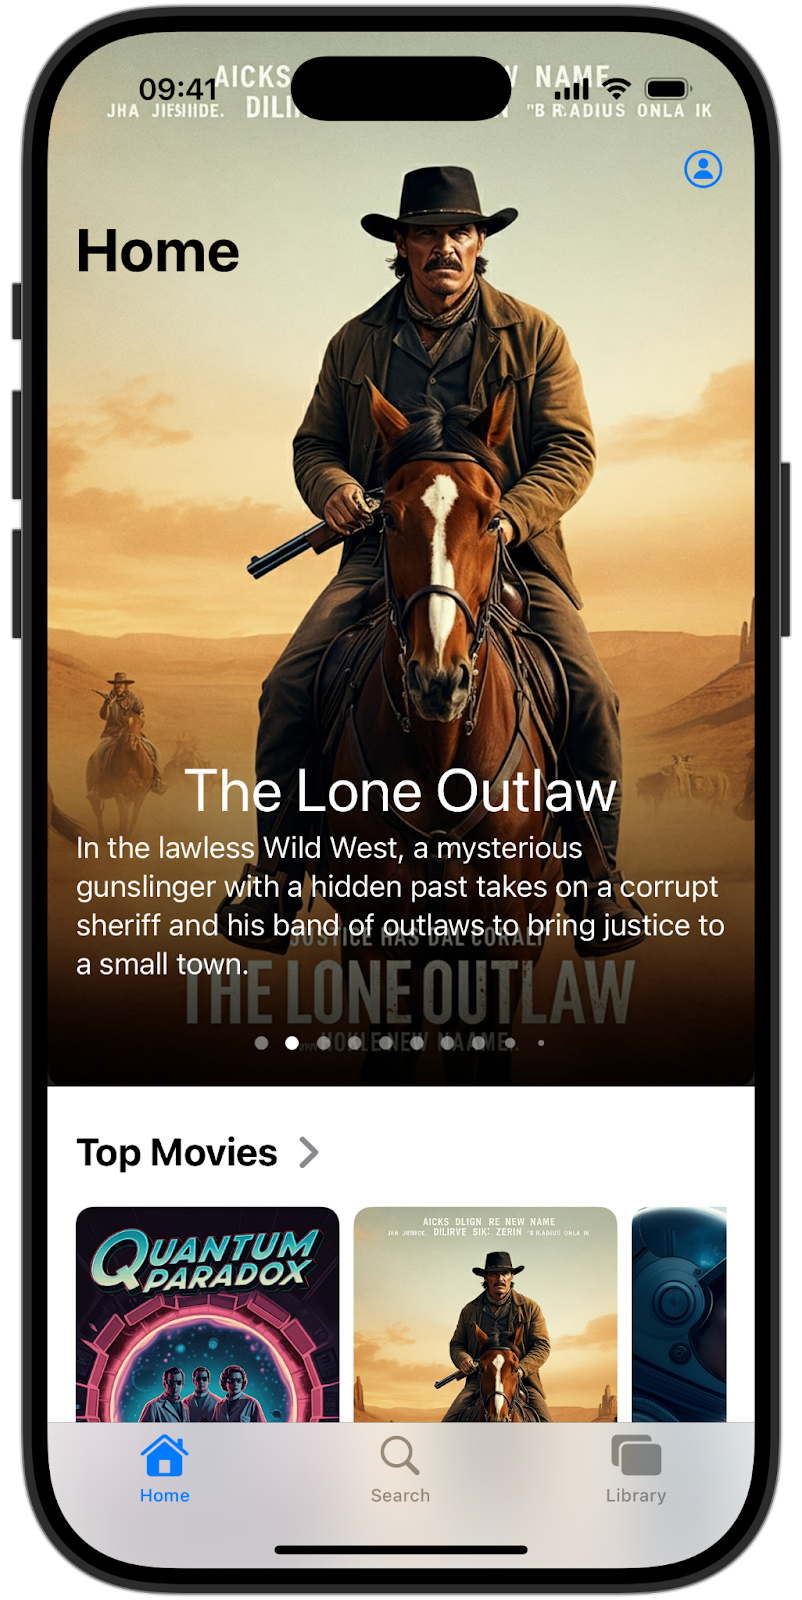
You might notice that all areas of the app (the hero section, top movies, and watch list) show the same list. This is because you're using the same query for all those views. In the next sections, you will implement custom queries. |
6. Display hero and top movies
In this step, you will focus on updating the way movies are displayed in the hero section – that's the prominent carousel at the top of the home screen – and also in the top movies section below.
Currently, the ListMovies query retrieves all movies. To optimize the display for these sections, you will limit the number of movies each query returns. The current implementation of the ListMovies query doesn't yet offer built-in support for limiting results - adding support for limiting and ordering is something you will add in this section.
Enhance the ListMovies query
Open queries.gql and update ListMovies as follows to add support for ordering and limiting:
query ListMovies(
  $orderByRating: OrderDirection
  $orderByReleaseYear: OrderDirection
  $limit: Int
) @auth(level: PUBLIC) {
  movies(
    orderBy: [{ rating: $orderByRating }, { releaseYear: $orderByReleaseYear }]
    limit: $limit
  ) {
    id
    title
    description
    releaseYear
    rating
    imageUrl
  }
}
This will allow you to limit the number of movies that the query returns, and to order the result set by both rating and release year.
Once you save this file, Firebase Data Connect will automatically re-generate the code within FriendlyFlixSDK. In the next step, you can update the code in HomeScreen.swift to make use of these additional features.
Use the enhanced query in the UI
Go back to Xcode to make the required changes to HomeScreen.swift.
First, update heroMoviesRef to fetch the 3 most recently released movies:
struct HomeScreen {
  ...

  init() {
    heroMoviesRef = connector.listMoviesQuery
      .ref { optionalVars in
        optionalVars.limit = 3
        optionalVars.orderByReleaseYear = .DESC
      }

  }
}
Next, set up another query reference for the top movies, and set the filter to the 5 highest rated movies:
struct HomeScreen {
  ...

  let topMoviesRef: QueryRefObservation<ListMoviesQuery.Data, ListMoviesQuery.Variables>

  init() {
    heroMoviesRef = ...

    topMoviesRef = connector.listMoviesQuery
      .ref { optionalVars in
        optionalVars.limit = 5
        optionalVars.orderByRating = .DESC
      }
  }
}
Finally, update the computed property that connects the result of this query to the UI:
extension HomeScreen {
  ...

  private var topMovies: [Movie] {
    topMoviesRef.data?.movies.map(Movie.init) ?? []
  }

}
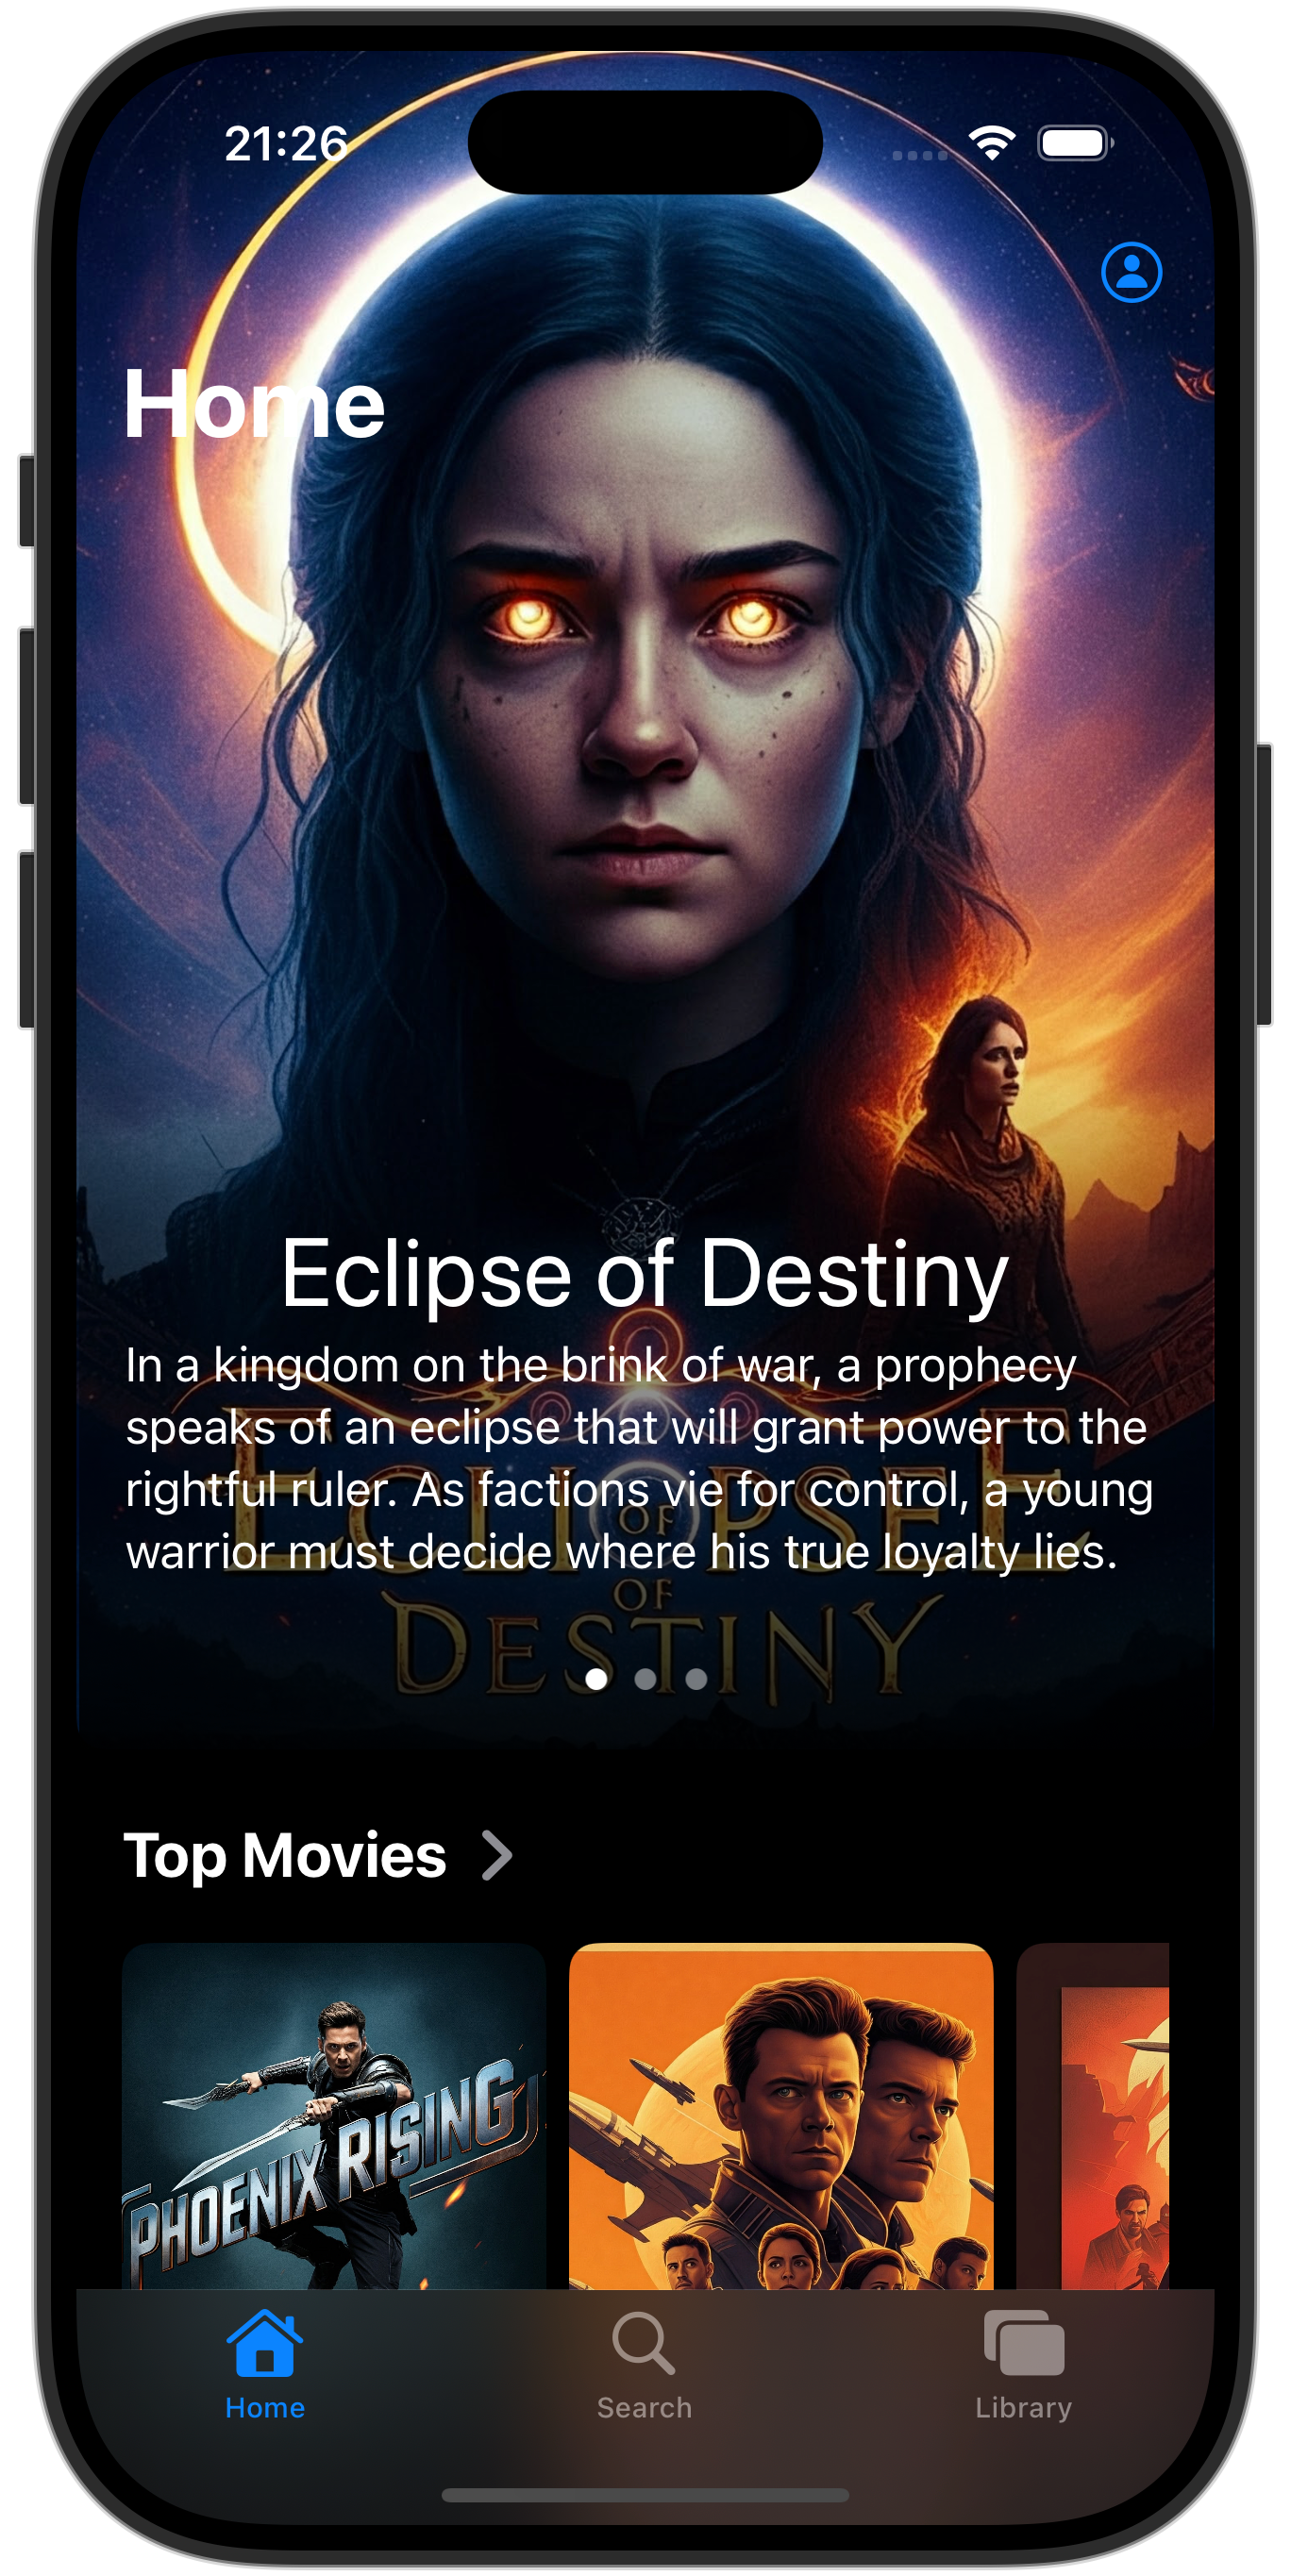
See it in action
Run the app again to see the 3 most recent movies in the hero section, and the 5 highest rated movies in the top movies section:
7. Display movie and actor details
The user can now browse movies. When tapping on a movie card, they will be shown some details about the movie, but you might have noticed that the details lack a certain amount of, well... detail!
This is because we only fetched as much details about each movie as we needed to render the movie hero section and the top movies section: the movie title, a short description, and the image URL.
On the movie details page, we'll want to show more information about the movie. In this section, you will enhance the app so that it can show the movie's actors and any reviews on the details page.
For this, you will need to do a couple of things:
- Enhance the schema to support movie actors and reviews
- Write Firebase Data Connect queries for fetching details about a given movie
- Showing the results on the movie details screen
Enhance the schema
In VS Code, open dataconnect/schema/schema.gql and add the schema definitions for Actor and MovieActor.
## Actors
## An actor can participate in multiple movies; movies can have multiple actors
## Movie - Actors (or vice versa) is a many to many relationship
type Actor @table {
  id: UUID!
  imageUrl: String!
  name: String! @col(name: "name", dataType: "varchar(30)")
}

## Join table for many-to-many relationship for movies and actors
## The 'key' param signifies the primary key(s) of this table
## In this case, the keys are [movieId, actorId], the generated fields of the reference types [movie, actor]
type MovieActor @table(key: ["movie", "actor"]) {
  ## @ref creates a field in the current table (MovieActor) that holds the primary key of the referenced type
  ## In this case, @ref(fields: "id") is implied
  movie: Movie!
  ## movieId: UUID! <- this is created by the implied @ref, see: implicit.gql

  actor: Actor!
  ## actorId: UUID! <- this is created by the implied  @ref, see: implicit.gql

  role: String! ## "main" or "supporting"
}
Add mock data for actors
With the schema updated, you can now populate the database with more mock data for testing.
- In Finder, copy
finish/FriendlyFlix/dataconnect/moviededetails_insert.gqlto thestart/FriendlyFlix/dataconnectfolder. - In VS Code, open
dataconnect/moviededetails_insert.gql. - Ensure the emulators in the Firebase Data Connect extension are running.
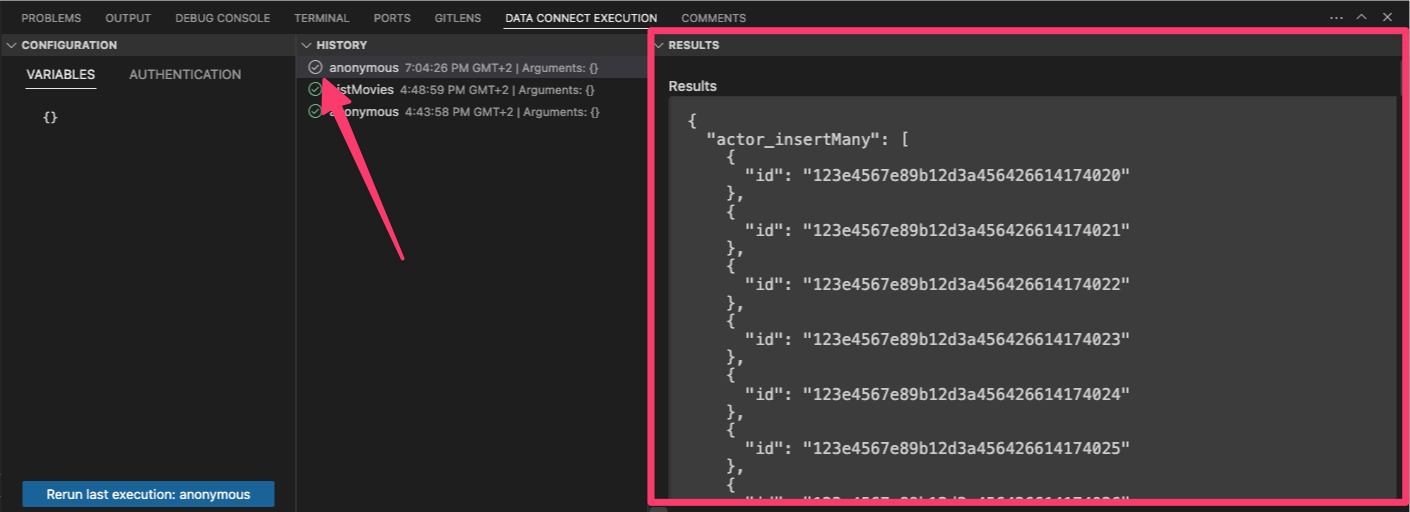
- You should see a Run (local) button at the top of the file. Click this to insert the mock movie data into your database.

- Check the Data Connect Execution terminal to confirm that the data was added successfully.
With the data in place, proceed to the next step to define the query to fetch the movie details.
Define the GetMovieById query
In VS Code, open the dataconnect/connector/queries.gql file and add the GetMovieById query:
## Get movie by id
query GetMovieById($id: UUID!) @auth(level: PUBLIC) {
  movie(id: $id) {
    id
    title
    imageUrl
    releaseYear
    genre
    rating
    description
    tags
    metadata: movieMetadatas_on_movie {
      director
    }
    mainActors: actors_via_MovieActor(where: { role: { eq: "main" } }) {
      id
      name
      imageUrl
    }
    supportingActors: actors_via_MovieActor(
      where: { role: { eq: "supporting" } }
    ) {
      id
      name
      imageUrl
    }
  }
}
Connect the GetMovieById query to the MovieDetailsView
In Xcode, open the MovieDetailsView.swift file and update the movieDetails computed property to match the following code:
import NukeUI
import SwiftUI
import FirebaseDataConnect
import FriendlyFlixSDK

@MainActor
struct MovieDetailsView: View {
  private var movie: Movie

  private var movieDetails: MovieDetails? {
    DataConnect.friendlyFlixConnector
      .getMovieByIdQuery
      .ref(id: movie.id)
      .data?.movie.map { movieDetails in
        MovieDetails(
          title: movieDetails.title,
          description: movieDetails.description ?? "",
          releaseYear: movieDetails.releaseYear,
          rating: movieDetails.rating ?? 0,
          imageUrl: movieDetails.imageUrl,
          mainActors: movieDetails.mainActors.map { mainActor in
            MovieActor(id: mainActor.id,
                       name: mainActor.name,
                       imageUrl: mainActor.imageUrl)
          },
          supportingActors: movieDetails.supportingActors.map{ supportingActor in
            MovieActor(id: supportingActor.id,
                       name: supportingActor.name,
                       imageUrl: supportingActor.imageUrl)
          },
          reviews: []
        )
      }
  }

  public init(movie: Movie) {
    self.movie = movie
  }
}
Run the app
In Xcode, click on the Run button to launch the app on the iOS Simulator.
Once the app launches, tap on a movie card to display the movie details. It should look like this:
8. Implement user authentication
Currently, the app presents non-personalized movie and actor information. In the following steps, you will implement features that associate data with the signed-in user. You'll start by allowing users to add movies to their personal watchlist.
Before you can implement the watchlist feature, you first need to establish user identity. To enable this, you'll integrate Firebase Authentication, allowing users to sign in to the app.
You might have already spotted the user avatar button in the top right of the home screen. Tapping this will lead you to a screen where users can sign up or sign in using their email and password.
Once a user successfully signs in, your app will need to store their essential details, primarily their unique user ID and chosen username.
Enable Firebase Authentication
In the Firebase console for your project, go to the Authentication section and enable Firebase Authentication. Then, enable the Email/Password authentication provider.
In your local project folder, find firebase.json and update it as follows to enable the Firebase Authentication emulator.
{
  "emulators": {
    "dataconnect": {
    },
    "auth": {
    }
  },
  "dataconnect": {
    "source": "dataconnect"
  }
}
After this, you need to stop and restart the Firebase Emulator for the change to take effect.
Implement an authentication handler
In the following section, you'll be implementing the logic that connects user authentication with your database. This involves creating an authentication handler that listens for successful sign-ins.
Once a user is authenticated, this handler will automatically trigger the creation of their corresponding account in your database.
In Xcode, open the AuthenticationService.swift file and add the following code:
import Foundation
import Observation
import os
import FirebaseAuth

enum AuthenticationState {
  case unauthenticated
  case authenticating
  case authenticated
}

@Observable
class AuthenticationService {
  private let logger = Logger(subsystem: "FriendlyFlix", category: "auth")

  var presentingAuthenticationDialog = false
  var presentingAccountDialog = false

  var authenticationState: AuthenticationState = .unauthenticated
  var user: User?
  private var authenticationListener: AuthStateDidChangeListenerHandle?

  init() {
    authenticationListener = Auth.auth().addStateDidChangeListener { auth, user in
      if let user {
        self.authenticationState = .authenticated
        self.user = user
      } else {
        self.authenticationState = .unauthenticated
      }
    }
  }

  private var onSignUp: ((User) -> Void)?
  public func onSignUp(_ action: @escaping (User) -> Void) {
    onSignUp = action
  }

  func signInWithEmailPassword(email: String, password: String) async throws {
    try await Auth.auth().signIn(withEmail: email, password: password)
    authenticationState = .authenticated
  }

  func signUpWithEmailPassword(email: String, password: String) async throws {
    try await Auth.auth().createUser(withEmail: email, password: password)

    if let onSignUp, let user = Auth.auth().currentUser {
      logger
        .debug(
          "User signed in \(user.displayName ?? "(no fullname)") with email \(user.email ?? "(no email)")"
        )
      onSignUp(user)
    }

    authenticationState = .authenticated
  }

  func signOut() throws {
    try Auth.auth().signOut()
    authenticationState = .unauthenticated
  }
}
This is a generic authentication handler that allows you to use onSignUp to register a closure that will be called when the user has signed in.
Inside that closure, you can then create a new user account in the database. But before you can do this, you need to create a mutation that lets you create or update new users in the database.
Add a User entity to the schema
The User type defines a user entity. Users can interact with movies by leaving reviews or favoriting movies.
In VS Code, open the dataconnect/schema/schema.gql file and add the following User table definition:
## Users
## A user can leave reviews for movies
## user-reviews is a one to many relationship, movie-reviews is a one to many relationship, movie:user is a many to many relationship
type User @table {
  id: String! @col(name: "user_auth")
  username: String! @col(name: "username", dataType: "varchar(50)")
}
Define a mutation for inserting or updating a user
In VS Code, open the dataconnect/connector/mutations.gql file and add the UpsertUser mutation:
mutation UpsertUser($username: String!) @auth(level: USER) {
  user_upsert(
    data: {
      id_expr: "auth.uid"
      username: $username
    }
  )
}
Create a new user after successfully logging in
In Xcode, open FriendlyFlixApp.swift, and add the following code to the initializer:
@main
struct FriendlyFlixApp: App {

  ...

  init() {
    ...
    authenticationService = AuthenticationService()
    authenticationService?.onSignUp { user in
      let userName = String(user.email?.split(separator: "@").first ?? "(unknown)")
      Task {
        try await DataConnect.friendlyFlixConnector
          .upsertUserMutation.execute(username: userName)
      }
    }
  }

  var body: some Scene {
    ...
  }
}
This code uses the upsertUserMutation Firebase Data Connect generated for you to insert a new user (or update an existing user with the same ID) whenever a user successfully signed up using Firebase Authentication.
See it in action
To verify this works, first sign up in the iOS app:
- If you haven't, stop and restart the Firebase Emulator to ensure the Firebase Authentication Emulator is running.
- In Xcode, click on the Run button to launch the app on the iOS Simulator.
- Click on the avatar icon at the top right corner of the screen.
- Switch to the Sign up flow and sign up to the app.
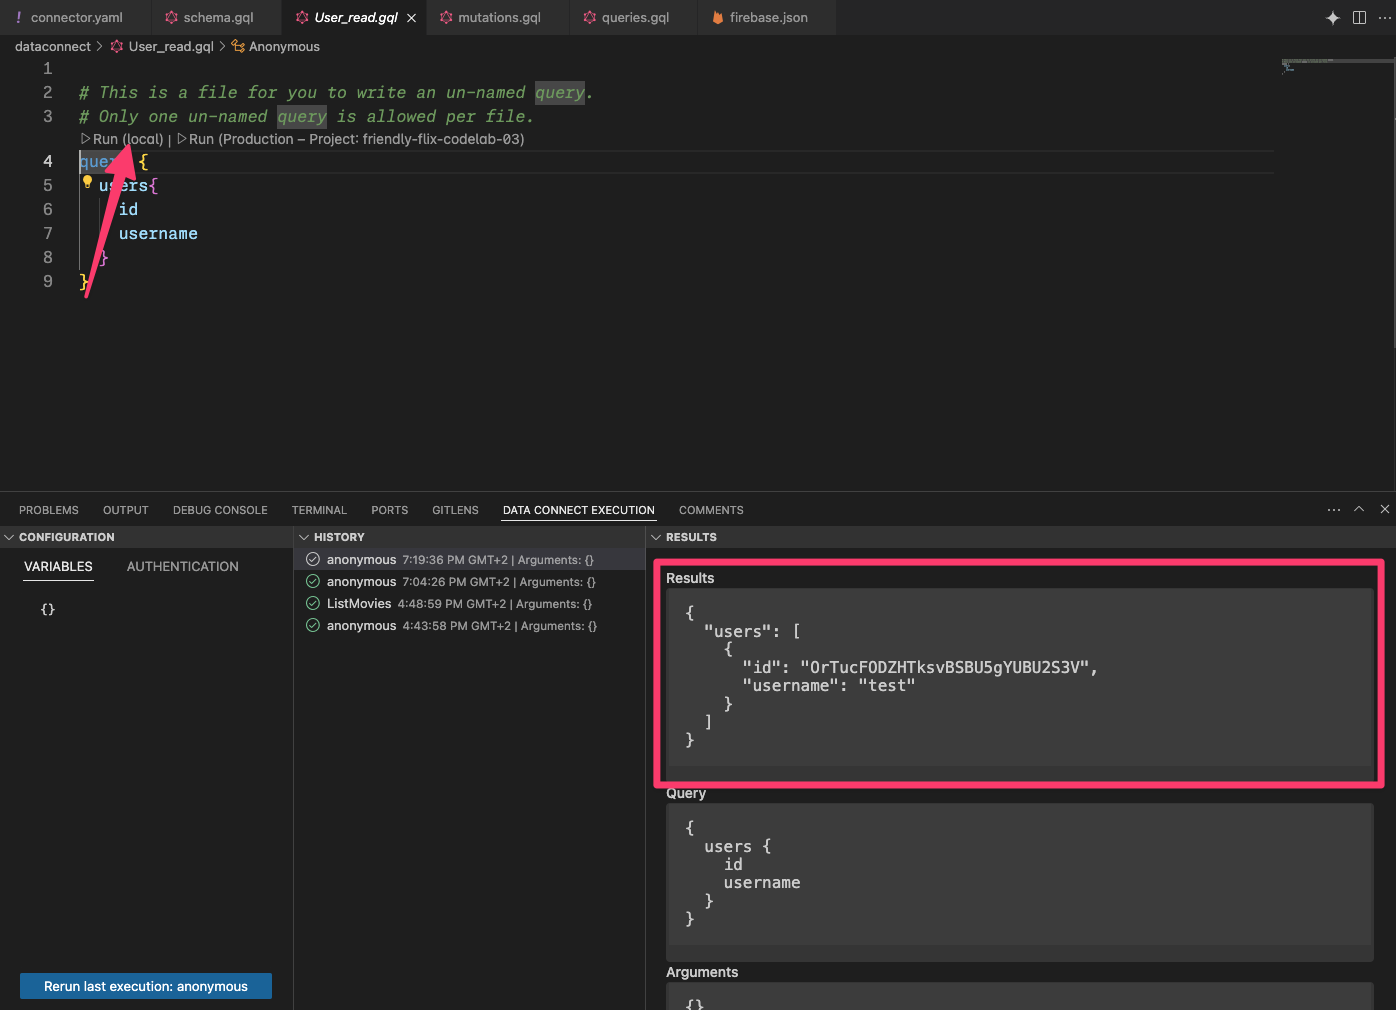
Then, query the database to verify the app created a new user account for the user:
- In VS Code, open
dataconnect/schema/schema.gqland click Read data on theUserentity - This will create a new query file, named
User_read.gql - Click on Run local to see all users in the users table
- In the Data Connect Execution pane, you should now see an account for the user you've just signed up with
9. Manage favorite movies
In this section of the codelab, you'll implement user interactions in the movie review app, specifically letting users manage their favorite movies. Movies marked as favorites will show up in the watch list section of the app.
Enhance the schema to support favorites
The FavoriteMovie type is a join table that handles many-to-many relationships between users and their favorite movies. Each table links a User to a Movie.
Copy and paste the code snippet into your dataconnect/schema/schema.gql file:
type FavoriteMovie
  @table(name: "FavoriteMovies", singular: "favorite_movie", plural: "favorite_movies", key: ["user", "movie"]) {
  ## @ref is implicit
  user: User!
  movie: Movie!
}
Define mutations for adding and removing favorites
Before the app can display the user's favorite movies, the user needs to indicate which are their favorites. To achieve this, you first need to add two mutations to mark a movie as one of the user's favorites, or remove it from their favorites again, respectively.
- In VS Code, open
mutations.gqlindataconnect/connector/mutations.gql - Add the following mutations to handle favoriting movies:
## Add a movie to the user's favorites list
mutation AddFavoritedMovie($movieId: UUID!) @auth(level: USER) {
  favorite_movie_upsert(data: { userId_expr: "auth.uid", movieId: $movieId })
}

## Remove a movie from the user's favorites list
mutation DeleteFavoritedMovie($movieId: UUID!) @auth(level: USER) {
  favorite_movie_delete(key: { userId_expr: "auth.uid", movieId: $movieId })
}
Connect the mutations to your app's UI
Users can mark a movie as a favorite by clicking on the heart icon on the movie's details screen.
To connect the mutations you just created to the app's UI, make the following changes in MovieCardView:
- Import the
FriendlyFlixSDKand set up the connector
import NukeUI
import os
import SwiftUI
import FirebaseDataConnect
import FriendlyFlixSDK

struct MovieCardView: View {
  private let logger = Logger(subsystem: "FriendlyFlix", category: "moviecard")
  @Environment(\.dismiss) private var dismiss
  private var connector = DataConnect.friendlyFlixConnector

  ...
}
- Implement the
toggleFavouritemethod. It will be called whenever the user taps on the heart icon in theMovieCardView:
struct MovieCardView {

  ...

  private func toggleFavourite() {
    Task {
      if isFavourite {
        let _ = try await connector.deleteFavoritedMovieMutation.execute(movieId: movie.id)
      } else {
        let _ = try await connector.addFavoritedMovieMutation.execute(movieId: movie.id)
      }
    }
  }
}
This will update the favorite state of the current movie in the database. One final step that's missing is to make sure the UI state is reflected accordingly.
Define a query for figuring out if a movie is marked as a favorite
- In VS Code, open
queries.gqlindataconnect/connector. - Add the following query to check if a movie is marked as a favorite:
query GetIfFavoritedMovie($movieId: UUID!) @auth(level: USER) {
  favorite_movie(key: { userId_expr: "auth.uid", movieId: $movieId }) {
    movieId
  }
}
- In Xcode, Instantiate a reference to the
GetIfFavoritedMoviequery and implement the computed property that determines whether the movie shown on thisMovieCardViewis marked as a favorite for the current user.
struct MovieCardView: View {

  ...

  public init(showDetails: Bool, movie: Movie) {
    self.showDetails = showDetails
    self.movie = movie

    isFavouriteRef = connector.getIfFavoritedMovieQuery.ref(movieId: movie.id)
  }

  // MARK: - Favourite handling

  private let isFavouriteRef: QueryRefObservation<
    GetIfFavoritedMovieQuery.Data,
    GetIfFavoritedMovieQuery.Variables
  >
  private var isFavourite: Bool {
    isFavouriteRef.data?.favorite_movie?.movieId != nil
  }

  ...

}
- Update the code in
toggleFavouriteto execute the query whenever the user taps the button. This makes sure that theisFavouritecomputed property always returns the correct value.
  private func toggleFavourite() {
    Task {
      if isFavourite {
        ...
      }

      let _ = try await isFavouriteRef.execute()
    }
  }
Fetch favorite movies
As a final step for this feature, you will implement fetching the user's favorite movies so they can see them on their watch list.
- In VS Code, open
queries.gqlindataconnect/connector/queries.gqland paste the following query:
## Get favorite movies by user ID
query GetUserFavoriteMovies @auth(level: USER) {
  user(id_expr: "auth.uid") {
    favoriteMovies: favorite_movies_on_user {
      movie {
        id
        title
        genre
        imageUrl
        releaseYear
        rating
        description
      }
    }
  }
}
The user's list of favorite movies is displayed on the LibraryScreen. This screen should only display data if the user is signed in, so you will first connect the screen's authentication state to the app's AuthenticationService.
- Add code to map from a
FavoriteMovieFavoriteMoviesto aMovietoMovie+DataConnect.swift:
import FirebaseDataConnect
import FriendlyFlixSDK

extension Movie {

  ...

  init(from: GetUserFavoriteMoviesQuery.Data.User.FavoriteMovieFavoriteMovies) {
    id = from.movie.id
    title = from.movie.title
    description = from.movie.description ?? ""
    releaseYear = from.movie.releaseYear
    rating = from.movie.rating
    imageUrl = from.movie.imageUrl
  }
}
- In Xcode, open
LibraryScreen, then updateisSignedInas follows:
struct LibraryScreen: View {
  ...

  private var isSignedIn: Bool {
    authenticationService.user != nil
  }

}
- Then, import Firebase Data Connect and FriendlyFlixSDK, and get a reference to the
GetUserFavoriteMoviesquery:
import SwiftUI
import FirebaseDataConnect
import FriendlyFlixSDK

struct LibraryScreen {

 ...

  private var connector = DataConnect.friendlyFlixConnector

  ...

  init() {
    watchListRef = connector.getUserFavoriteMoviesQuery.ref()
  }

  private let watchListRef: QueryRefObservation<
    GetUserFavoriteMoviesQuery.Data,
    GetUserFavoriteMoviesQuery.Variables
  >
  private var watchList: [Movie] {
    watchListRef.data?.user?.favoriteMovies.map(Movie.init) ?? []
  }

  ...

}
- Make sure the
watchListRefquery is executed when the view appears:
extension LibraryScreen: View {
  var body: some View {
    ...
            MovieListSection(namespace: namespace, title: "Watch List", movies: watchList)
              .onAppear {
                Task {
                  try await watchListRef.execute()
                }
  ...
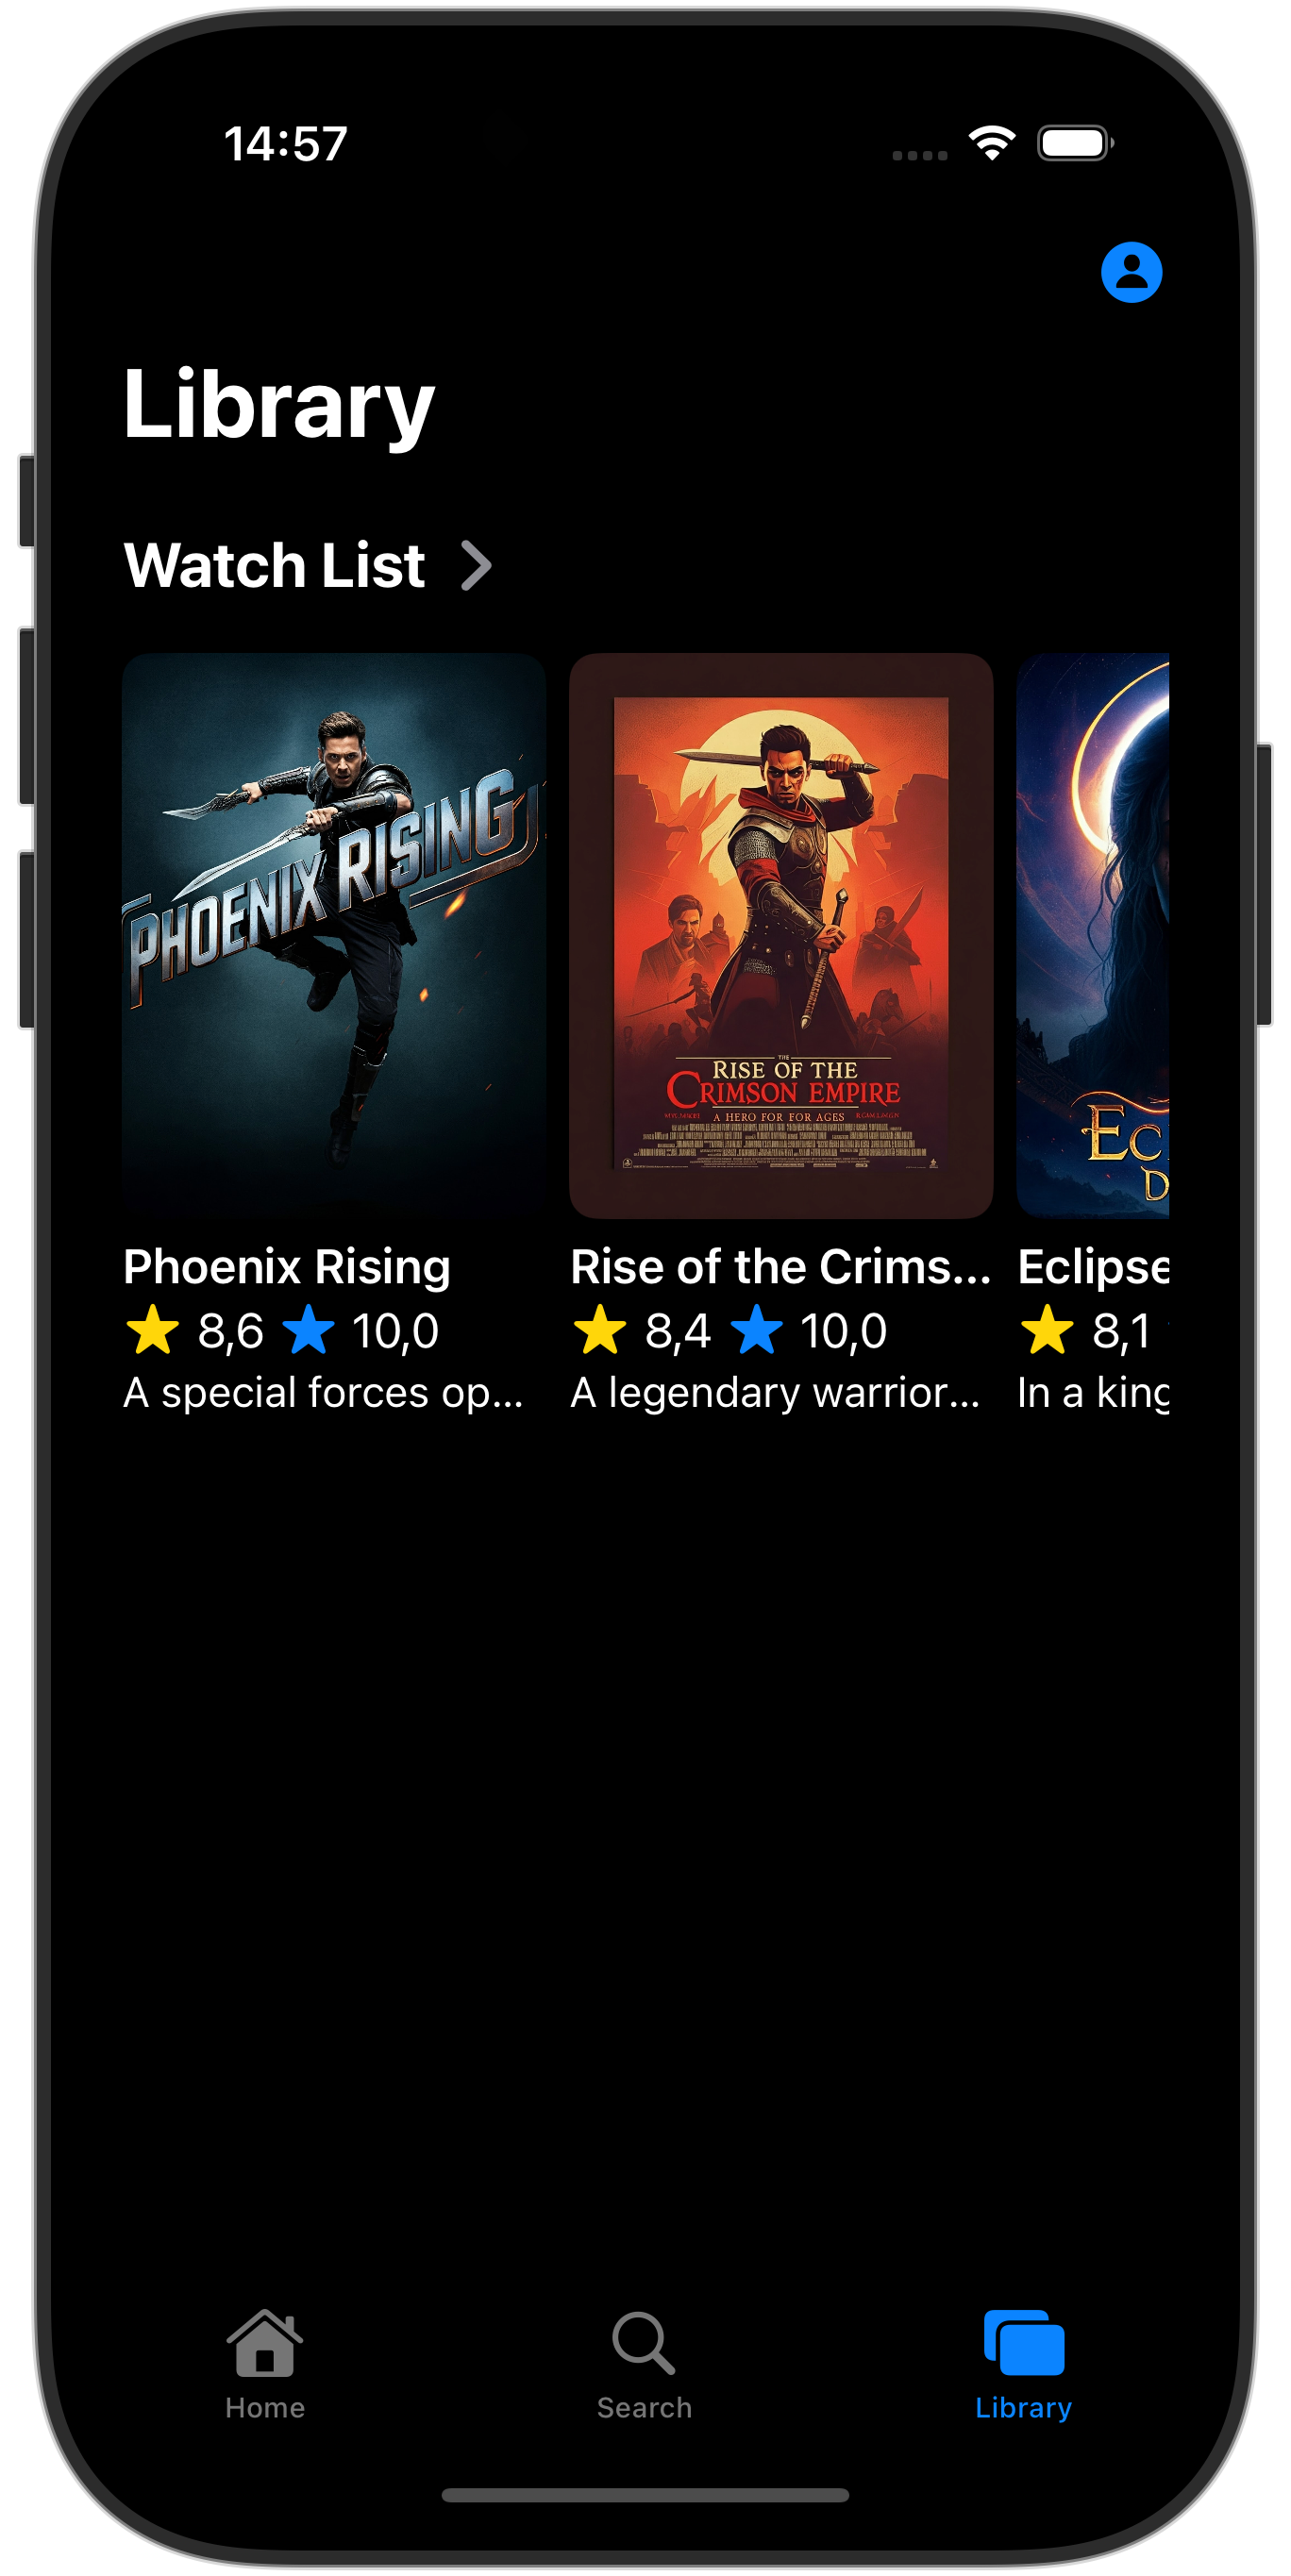
See it in action
You can now run the app and try out the favorites feature you just implemented. A couple of things to keep in mind:
- Make sure the Firebase Emulator is running
- Make sure you have added mock data for the movies and movie details
- Make sure you have signed up as a user
- In Xcode, click on the Run button to launch the app on the iOS Simulator.
- Once the app launches, tap on a movie card to display the movie details.
- Tap on the heart icon to mark the movie as a favorite. The heart should turn solid.
- Repeat this for a couple of movies.
- Go to the Library tab. You should now see a list of all the movies you marked as favorites.
10. Congratulations
Congratulations, you have successfully added Firebase Data Connect to an iOS app! Now you know the key steps required to set up Data Connect, create queries and mutations, and handle user authentication.
Optional: deploy to production
So far this app has only used the Firebase Emulators. If you want to learn how to deploy this app to a real Firebase project, continue on to the next step.
11. (Optional) Deploy your app
So far this app has been entirely local, all of the data is contained in the Firebase Emulator Suite. In this section you will learn how to configure your Firebase project so that this app will work in production.
Enable Firebase Authentication
- In the Firebase console, go to the Authentication section and click Get started.
- Navigate to the Sign-in method tab .
- Select the Email/Password option from the native providers section,
- Enable the Email/Password provider, then click Save.
Enable Firebase Data Connect
Important: If this is your first time deploying a schema in your project, this process will create a Cloud SQL PostgreSQL instance, which can take around 15 minutes. You won't be able to deploy until the Cloud SQL instance is ready and integrated with Firebase Data Connect.
1. In the Firebase Data Connect VS Code extension UI, click Deploy to production. 2. You may need to review schema changes and approve potentially destructive modifications. You'll be prompted to: - Review schema changes using firebase dataconnect:sql:diff - When you are satisfied with changes, apply them using the flow started by firebase dataconnect:sql:migrate
Your Cloud SQL for PostgreSQL instance will be updated with the final deployed schema and data. You can monitor the status in the Firebase Console.
Now you can click Run (Production) in the Firebase Data Connect panel, just as you did with the local emulators, to add data to the production environment.
Before running the iOS app again, make sure it connects to the production instance of your project:
- Open the Product > Scheme > Edit Scheme... menu.
- In the Run section, uncheck the
-useEmulator YESlaunch argument.