
Korzystając z protokołów serwera aplikacji Firebase Admin SDK lub FCM, możesz tworzyć żądania wiadomości i wysyłać je do tych typów miejsc docelowych:
- Nazwa tematu
- Stan
- Token rejestracji urządzenia
- Nazwa grupy urządzeń (tylko protokół)
Możesz wysyłać wiadomości z ładunkiem powiadomienia składającym się ze wstępnie zdefiniowanych pól, ładunkiem danych zawierającym zdefiniowane przez Ciebie pola lub wiadomości zawierające oba rodzaje ładunków. Więcej informacji znajdziesz w sekcji Typy wiadomości.
Przykłady na tej stronie pokazują, jak wysyłać wiadomości z powiadomieniami za pomocą pakietu SDK Firebase Admin (który obsługuje Node, Java, Python, C# i Go) oraz protokołu HTTP v1.Firebase Admin SDK
Wysyłanie wiadomości na określone urządzenia
Aby wysłać powiadomienie na jedno konkretne urządzenie, przekaż token rejestracji urządzenia w sposób pokazany poniżej. Więcej informacji o tokenach rejestracji znajdziesz w informacjach o konfiguracji klienta na Twojej platformie.
Node.js
// This registration token comes from the client FCM SDKs.
const registrationToken = 'YOUR_REGISTRATION_TOKEN';

const message = {
  data: {
    score: '850',
    time: '2:45'
  },
  token: registrationToken
};

// Send a message to the device corresponding to the provided
// registration token.
getMessaging().send(message)
  .then((response) => {
    // Response is a message ID string.
    console.log('Successfully sent message:', response);
  })
  .catch((error) => {
    console.log('Error sending message:', error);
  });
Java
// This registration token comes from the client FCM SDKs.
String registrationToken = "YOUR_REGISTRATION_TOKEN";
// See documentation on defining a message payload.
Message message = Message.builder()
.putData("score", "850")
.putData("time", "2:45")
.setToken(registrationToken)
.build();
// Send a message to the device corresponding to the provided
// registration token.
String response = FirebaseMessaging.getInstance().send(message);
// Response is a message ID string.
System.out.println("Successfully sent message: " + response);
Python
# This registration token comes from the client FCM SDKs.
registration_token = 'YOUR_REGISTRATION_TOKEN'
# See documentation on defining a message payload.
message = messaging.Message(
data={
'score': '850',
'time': '2:45',
},
token=registration_token,
)
# Send a message to the device corresponding to the provided
# registration token.
response = messaging.send(message)
# Response is a message ID string.
print('Successfully sent message:', response)
Go
// Obtain a messaging.Client from the App.
ctx := context.Background()
client, err := app.Messaging(ctx)
if err != nil {
log.Fatalf("error getting Messaging client: %v\n", err)
}
// This registration token comes from the client FCM SDKs.
registrationToken := "YOUR_REGISTRATION_TOKEN"
// See documentation on defining a message payload.
message := &messaging.Message{
Data: map[string]string{
"score": "850",
"time": "2:45",
},
Token: registrationToken,
}
// Send a message to the device corresponding to the provided
// registration token.
response, err := client.Send(ctx, message)
if err != nil {
log.Fatalln(err)
}
// Response is a message ID string.
fmt.Println("Successfully sent message:", response)
C#
// This registration token comes from the client FCM SDKs.
var registrationToken = "YOUR_REGISTRATION_TOKEN";

// See documentation on defining a message payload.
var message = new Message()
{
    Data = new Dictionary<string, string>()
    {
        { "score", "850" },
        { "time", "2:45" },
    },
    Token = registrationToken,
};

// Send a message to the device corresponding to the provided
// registration token.
string response = await FirebaseMessaging.DefaultInstance.SendAsync(message);
// Response is a message ID string.
Console.WriteLine("Successfully sent message: " + response);
REST
POST https://fcm.googleapis.com/v1/projects/myproject-b5ae1/messages:send HTTP/1.1

Content-Type: application/json
Authorization: Bearer ya29.ElqKBGN2Ri_Uz...HnS_uNreA

{
   "message":{
      "token":"bk3RNwTe3H0:CI2k_HHwgIpoDKCIZvvDMExUdFQ3P1...",
      "notification":{
        "body":"This is an FCM notification message!",
        "title":"FCM Message"
      }
   }
}
Polecenie cURL:
curl -X POST -H "Authorization: Bearer ya29.ElqKBGN2Ri_Uz...HnS_uNreA" -H "Content-Type: application/json" -d '{
"message":{
   "notification":{
     "title":"FCM Message",
     "body":"This is an FCM Message"
   },
   "token":"bk3RNwTe3H0:CI2k_HHwgIpoDKCIZvvDMExUdFQ3P1..."
}}' https://fcm.googleapis.com/v1/projects/myproject-b5ae1/messages:send
W przypadku powodzenia każda metoda wysyłania zwraca identyfikator wiadomości. Firebase Admin SDK zwraca ciąg identyfikatora w formacie projects/{project_id}/messages/{message_id}.
Odpowiedź protokołu HTTP to pojedynczy klucz JSON:
    {
      "name":"projects/myproject-b5ae1/messages/0:1500415314455276%31bd1c9631bd1c96"
    }
Wysyłanie jednej wiadomości na kilka urządzeń
Pakiety SDK administratora FCM umożliwiają wysyłanie wiadomości do wielu odbiorców na listę tokenów rejestracji urządzeń. Możesz używać tej funkcji, gdy musisz wysłać tę samą wiadomość na dużą liczbę urządzeń. Możesz określić maksymalnie 500 tokenów rejestracji urządzenia na wywołanie.
Zwracana wartość zawiera listę tokenów, która odpowiada kolejności tokenów wejściowych. Jest to przydatne, gdy chcesz sprawdzić, które tokeny spowodowały błędy, a następnie odpowiednio je obsłużyć.
Node.js
// These registration tokens come from the client FCM SDKs.
const registrationTokens = [
  'YOUR_REGISTRATION_TOKEN_1',
  // …
  'YOUR_REGISTRATION_TOKEN_N',
];

const message = {
  data: {score: '850', time: '2:45'},
  tokens: registrationTokens,
};

getMessaging().sendEachForMulticast(message)
  .then((response) => {
    if (response.failureCount > 0) {
      const failedTokens = [];
      response.responses.forEach((resp, idx) => {
        if (!resp.success) {
          failedTokens.push(registrationTokens[idx]);
        }
      });
      console.log('List of tokens that caused failures: ' + failedTokens);
    }
  });
Java
// These registration tokens come from the client FCM SDKs.
List<String> registrationTokens = Arrays.asList(
"YOUR_REGISTRATION_TOKEN_1",
// ...
"YOUR_REGISTRATION_TOKEN_n"
);
MulticastMessage message = MulticastMessage.builder()
.putData("score", "850")
.putData("time", "2:45")
.addAllTokens(registrationTokens)
.build();
BatchResponse response = FirebaseMessaging.getInstance().sendEachForMulticast(message);
if (response.getFailureCount() > 0) {
List<SendResponse> responses = response.getResponses();
List<String> failedTokens = new ArrayList<>();
for (int i = 0; i < responses.size(); i++) {
if (!responses.get(i).isSuccessful()) {
// The order of responses corresponds to the order of the registration tokens.
failedTokens.add(registrationTokens.get(i));
}
}
System.out.println("List of tokens that caused failures: " + failedTokens);
}
Python
# These registration tokens come from the client FCM SDKs.
registration_tokens = [
'YOUR_REGISTRATION_TOKEN_1',
# ...
'YOUR_REGISTRATION_TOKEN_N',
]
message = messaging.MulticastMessage(
data={'score': '850', 'time': '2:45'},
tokens=registration_tokens,
)
response = messaging.send_each_for_multicast(message)
if response.failure_count > 0:
responses = response.responses
failed_tokens = []
for idx, resp in enumerate(responses):
if not resp.success:
# The order of responses corresponds to the order of the registration tokens.
failed_tokens.append(registration_tokens[idx])
print('List of tokens that caused failures: {0}'.format(failed_tokens))
Go
// Create a list containing up to 500 registration tokens.
// This registration tokens come from the client FCM SDKs.
registrationTokens := []string{
"YOUR_REGISTRATION_TOKEN_1",
// ...
"YOUR_REGISTRATION_TOKEN_n",
}
message := &messaging.MulticastMessage{
Data: map[string]string{
"score": "850",
"time": "2:45",
},
Tokens: registrationTokens,
}
br, err := client.SendEachForMulticast(context.Background(), message)
if err != nil {
log.Fatalln(err)
}
if br.FailureCount > 0 {
var failedTokens []string
for idx, resp := range br.Responses {
if !resp.Success {
// The order of responses corresponds to the order of the registration tokens.
failedTokens = append(failedTokens, registrationTokens[idx])
}
}
fmt.Printf("List of tokens that caused failures: %v\n", failedTokens)
}
C#
// These registration tokens come from the client FCM SDKs.
var registrationTokens = new List<string>()
{
"YOUR_REGISTRATION_TOKEN_1",
// ...
"YOUR_REGISTRATION_TOKEN_n",
};
var message = new MulticastMessage()
{
Tokens = registrationTokens,
Data = new Dictionary<string, string>()
{
{ "score", "850" },
{ "time", "2:45" },
},
};
var response = await FirebaseMessaging.DefaultInstance.SendEachForMulticastAsync(message);
if (response.FailureCount > 0)
{
var failedTokens = new List<string>();
for (var i = 0; i < response.Responses.Count; i++)
{
if (!response.Responses[i].IsSuccess)
{
// The order of responses corresponds to the order of the registration tokens.
failedTokens.Add(registrationTokens[i]);
}
}
Console.WriteLine($"List of tokens that caused failures: {failedTokens}");
}
Wysyłanie listy wiadomości
Pakiety SDK administratora obsługują wysyłanie listy zawierającej maksymalnie 500 wiadomości. Za pomocą tej funkcji możesz tworzyć niestandardowe zestawy wiadomości i wysyłać je do różnych odbiorców, w tym do tematów lub konkretnych tokenów rejestracji urządzenia. Możesz na przykład użyć tej funkcji, gdy chcesz wysyłać do różnych odbiorców nieco odmienne komunikaty.
Node.js
// Create a list containing up to 500 messages.
const messages = [];
messages.push({
  notification: { title: 'Price drop', body: '5% off all electronics' },
  token: registrationToken,
});
messages.push({
  notification: { title: 'Price drop', body: '2% off all books' },
  topic: 'readers-club',
});

getMessaging().sendEach(messages)
  .then((response) => {
    console.log(response.successCount + ' messages were sent successfully');
  });
Java
// Create a list containing up to 500 messages.
List<Message> messages = Arrays.asList(
Message.builder()
.setNotification(Notification.builder()
.setTitle("Price drop")
.setBody("5% off all electronics")
.build())
.setToken(registrationToken)
.build(),
// ...
Message.builder()
.setNotification(Notification.builder()
.setTitle("Price drop")
.setBody("2% off all books")
.build())
.setTopic("readers-club")
.build()
);
BatchResponse response = FirebaseMessaging.getInstance().sendEach(messages);
// See the BatchResponse reference documentation
// for the contents of response.
System.out.println(response.getSuccessCount() + " messages were sent successfully");
Python
# Create a list containing up to 500 messages.
messages = [
messaging.Message(
notification=messaging.Notification('Price drop', '5% off all electronics'),
token=registration_token,
),
# ...
messaging.Message(
notification=messaging.Notification('Price drop', '2% off all books'),
topic='readers-club',
),
]
response = messaging.send_each(messages)
# See the BatchResponse reference documentation
# for the contents of response.
print('{0} messages were sent successfully'.format(response.success_count))
Go
// Create a list containing up to 500 messages.
messages := []*messaging.Message{
{
Notification: &messaging.Notification{
Title: "Price drop",
Body: "5% off all electronics",
},
Token: registrationToken,
},
{
Notification: &messaging.Notification{
Title: "Price drop",
Body: "2% off all books",
},
Topic: "readers-club",
},
}
br, err := client.SendEach(context.Background(), messages)
if err != nil {
log.Fatalln(err)
}
// See the BatchResponse reference documentation
// for the contents of response.
fmt.Printf("%d messages were sent successfully\n", br.SuccessCount)
C#
// Create a list containing up to 500 messages.
var messages = new List<Message>()
{
new Message()
{
Notification = new Notification()
{
Title = "Price drop",
Body = "5% off all electronics",
},
Token = registrationToken,
},
new Message()
{
Notification = new Notification()
{
Title = "Price drop",
Body = "2% off all books",
},
Topic = "readers-club",
},
};
var response = await FirebaseMessaging.DefaultInstance.SendEachAsync(messages);
// See the BatchResponse reference documentation
// for the contents of response.
Console.WriteLine($"{response.SuccessCount} messages were sent successfully");
Wysyłanie wiadomości do tematów
Po utworzeniu tematu (przez subskrybowanie instancji aplikacji klienckiej w temacie po stronie klienta lub za pomocą interfejsu API serwera) możesz wysyłać do niego wiadomości. Jeśli po raz pierwszy tworzysz żądania wysyłania dla FCM, zapoznaj się z przewodnikiem dotyczącym środowiska serwera i FCM, aby uzyskać ważne informacje o konfiguracji i kontekście.
W logice wysyłania na backendzie określ nazwę tematu w sposób pokazany poniżej:
Node.js
// The topic name can be optionally prefixed with "/topics/".
const topic = 'highScores';

const message = {
  data: {
    score: '850',
    time: '2:45'
  },
  topic: topic
};

// Send a message to devices subscribed to the provided topic.
getMessaging().send(message)
  .then((response) => {
    // Response is a message ID string.
    console.log('Successfully sent message:', response);
  })
  .catch((error) => {
    console.log('Error sending message:', error);
  });
Java
// The topic name can be optionally prefixed with "/topics/".
String topic = "highScores";
// See documentation on defining a message payload.
Message message = Message.builder()
.putData("score", "850")
.putData("time", "2:45")
.setTopic(topic)
.build();
// Send a message to the devices subscribed to the provided topic.
String response = FirebaseMessaging.getInstance().send(message);
// Response is a message ID string.
System.out.println("Successfully sent message: " + response);
Python
# The topic name can be optionally prefixed with "/topics/".
topic = 'highScores'
# See documentation on defining a message payload.
message = messaging.Message(
data={
'score': '850',
'time': '2:45',
},
topic=topic,
)
# Send a message to the devices subscribed to the provided topic.
response = messaging.send(message)
# Response is a message ID string.
print('Successfully sent message:', response)
Go
// The topic name can be optionally prefixed with "/topics/".
topic := "highScores"
// See documentation on defining a message payload.
message := &messaging.Message{
Data: map[string]string{
"score": "850",
"time": "2:45",
},
Topic: topic,
}
// Send a message to the devices subscribed to the provided topic.
response, err := client.Send(ctx, message)
if err != nil {
log.Fatalln(err)
}
// Response is a message ID string.
fmt.Println("Successfully sent message:", response)
C#
// The topic name can be optionally prefixed with "/topics/".
var topic = "highScores";

// See documentation on defining a message payload.
var message = new Message()
{
    Data = new Dictionary<string, string>()
    {
        { "score", "850" },
        { "time", "2:45" },
    },
    Topic = topic,
};

// Send a message to the devices subscribed to the provided topic.
string response = await FirebaseMessaging.DefaultInstance.SendAsync(message);
// Response is a message ID string.
Console.WriteLine("Successfully sent message: " + response);
REST
POST https://fcm.googleapis.com/v1/projects/myproject-b5ae1/messages:send HTTP/1.1

Content-Type: application/json
Authorization: Bearer ya29.ElqKBGN2Ri_Uz...HnS_uNreA
{
  "message":{
    "topic" : "foo-bar",
    "notification" : {
      "body" : "This is a Firebase Cloud Messaging Topic Message!",
      "title" : "FCM Message"
      }
   }
}
Polecenie cURL:
curl -X POST -H "Authorization: Bearer ya29.ElqKBGN2Ri_Uz...HnS_uNreA" -H "Content-Type: application/json" -d '{
  "message": {
    "topic" : "foo-bar",
    "notification": {
      "body": "This is a Firebase Cloud Messaging Topic Message!",
      "title": "FCM Message"
    }
  }
}' https://fcm.googleapis.com/v1/projects/myproject-b5ae1/messages:send HTTP/1.1
Aby wysłać wiadomość do kombinacji tematów, określ warunek, czyli wyrażenie logiczne, które określa docelowe tematy. Na przykład ten warunek spowoduje wysłanie wiadomości na urządzenia, które subskrybują TopicA oraz TopicB lub TopicC:
"'TopicA' in topics && ('TopicB' in topics || 'TopicC' in topics)"
FCM najpierw sprawdza warunki w nawiasach, a potem wyrażenie od lewej do prawej. W powyższym wyrażeniu użytkownik subskrybujący dowolny pojedynczy temat nie otrzyma wiadomości. Podobnie użytkownik, który nie subskrybuje TopicA, nie otrzyma wiadomości. Te kombinacje otrzymują go:
TopicAiTopicBTopicAiTopicC
W wyrażeniu warunkowym możesz uwzględnić maksymalnie 5 tematów.
Aby wysłać do warunku:
Node.js
// Define a condition which will send to devices which are subscribed
// to either the Google stock or the tech industry topics.
const condition = '\'stock-GOOG\' in topics || \'industry-tech\' in topics';

// See documentation on defining a message payload.
const message = {
  notification: {
    title: '$FooCorp up 1.43% on the day',
    body: '$FooCorp gained 11.80 points to close at 835.67, up 1.43% on the day.'
  },
  condition: condition
};

// Send a message to devices subscribed to the combination of topics
// specified by the provided condition.
getMessaging().send(message)
  .then((response) => {
    // Response is a message ID string.
    console.log('Successfully sent message:', response);
  })
  .catch((error) => {
    console.log('Error sending message:', error);
  });
Java
// Define a condition which will send to devices which are subscribed
// to either the Google stock or the tech industry topics.
String condition = "'stock-GOOG' in topics || 'industry-tech' in topics";
// See documentation on defining a message payload.
Message message = Message.builder()
.setNotification(Notification.builder()
.setTitle("$GOOG up 1.43% on the day")
.setBody("$GOOG gained 11.80 points to close at 835.67, up 1.43% on the day.")
.build())
.setCondition(condition)
.build();
// Send a message to devices subscribed to the combination of topics
// specified by the provided condition.
String response = FirebaseMessaging.getInstance().send(message);
// Response is a message ID string.
System.out.println("Successfully sent message: " + response);
Python
# Define a condition which will send to devices which are subscribed
# to either the Google stock or the tech industry topics.
condition = "'stock-GOOG' in topics || 'industry-tech' in topics"
# See documentation on defining a message payload.
message = messaging.Message(
notification=messaging.Notification(
title='$GOOG up 1.43% on the day',
body='$GOOG gained 11.80 points to close at 835.67, up 1.43% on the day.',
),
condition=condition,
)
# Send a message to devices subscribed to the combination of topics
# specified by the provided condition.
response = messaging.send(message)
# Response is a message ID string.
print('Successfully sent message:', response)
Go
// Define a condition which will send to devices which are subscribed
// to either the Google stock or the tech industry topics.
condition := "'stock-GOOG' in topics || 'industry-tech' in topics"
// See documentation on defining a message payload.
message := &messaging.Message{
Data: map[string]string{
"score": "850",
"time": "2:45",
},
Condition: condition,
}
// Send a message to devices subscribed to the combination of topics
// specified by the provided condition.
response, err := client.Send(ctx, message)
if err != nil {
log.Fatalln(err)
}
// Response is a message ID string.
fmt.Println("Successfully sent message:", response)
C#
// Define a condition which will send to devices which are subscribed
// to either the Google stock or the tech industry topics.
var condition = "'stock-GOOG' in topics || 'industry-tech' in topics";

// See documentation on defining a message payload.
var message = new Message()
{
    Notification = new Notification()
    {
        Title = "$GOOG up 1.43% on the day",
        Body = "$GOOG gained 11.80 points to close at 835.67, up 1.43% on the day.",
    },
    Condition = condition,
};

// Send a message to devices subscribed to the combination of topics
// specified by the provided condition.
string response = await FirebaseMessaging.DefaultInstance.SendAsync(message);
// Response is a message ID string.
Console.WriteLine("Successfully sent message: " + response);
REST
POST https://fcm.googleapis.com/v1/projects/myproject-b5ae1/messages:send HTTP/1.1

Content-Type: application/json
Authorization: Bearer ya29.ElqKBGN2Ri_Uz...HnS_uNreA
{
   "message":{
    "condition": "'dogs' in topics || 'cats' in topics",
    "notification" : {
      "body" : "This is a Firebase Cloud Messaging Topic Message!",
      "title" : "FCM Message",
    }
  }
}
Polecenie cURL:
curl -X POST -H "Authorization: Bearer ya29.ElqKBGN2Ri_Uz...HnS_uNreA" -H "Content-Type: application/json" -d '{
  "notification": {
    "title": "FCM Message",
    "body": "This is a Firebase Cloud Messaging Topic Message!",
  },
  "condition": "'dogs' in topics || 'cats' in topics"
}' https://fcm.googleapis.com/v1/projects/myproject-b5ae1/messages:send HTTP/1.1
Wysyłanie wiadomości do grup urządzeń
Wysyłanie wiadomości do grupy urządzeń jest bardzo podobne do wysyłania wiadomości do pojedynczego urządzenia. Używa się tej samej metody autoryzowania żądań wysyłania. W polu tokenustaw klucz powiadomienia grupy:
REST
POST https://fcm.googleapis.com/v1/projects/myproject-b5ae1/messages:send HTTP/1.1

Content-Type: application/json
Authorization: Bearer ya29.ElqKBGN2Ri_Uz...HnS_uNreA

{
   "message":{
      "token":"APA91bGHXQBB...9QgnYOEURwm0I3lmyqzk2TXQ",
      "data":{
        "hello": "This is a Firebase Cloud Messaging device group message!"
      }
   }
}
Polecenie cURL
curl -X POST -H "Authorization: Bearer ya29.ElqKBGN2Ri_Uz...HnS_uNreA" -H "Content-Type: application/json" -d '{
"message":{
   "data":{
     "hello": "This is a Firebase Cloud Messaging device group message!"
   },
   "token":"APA91bGHXQBB...9QgnYOEURwm0I3lmyqzk2TXQ"
}}' https://fcm.googleapis.com/v1/projects/myproject-b5ae1/messages:send
Wysyłanie wiadomości z włączonym bezpośrednim uruchamianiem (tylko na Androidzie)
Wiadomości do urządzeń w trybie bezpośredniego uruchamiania możesz wysyłać za pomocą interfejsów HTTP v1 lub starszych interfejsów HTTP API. Zanim wyślesz wiadomość na urządzenia w trybie bezpośredniego uruchamiania, wykonaj czynności, które umożliwią urządzeniom klienckim odbieranie wiadomości FCM w trybie bezpośredniego uruchamiania.
Wysyłanie za pomocą interfejsu HTTP API FCM w wersji 1
Żądanie wiadomości musi zawierać klucz "direct_boot_ok" : true w AndroidConfig opcjach treści żądania. Przykład:
https://fcm.googleapis.com/v1/projects/myproject-b5ae1/messages:send
Content-Type:application/json
Authorization: Bearer ya29.ElqKBGN2Ri_Uz...HnS_uNreA

{
  "message":{
    "token" : "bk3RNwTe3H0:CI2k_HHwgIpoDKCIZvvDMExUdFQ3P1..."
    "data": {
      "score": "5x1",
      "time": "15:10"
    },
    "android": {
      "direct_boot_ok": true,
    },
}
Dostosowywanie wiadomości na różnych platformach
Zarówno interfejs Firebase Admin SDK, jak i protokół HTTP FCM w wersji 1 umożliwiają ustawianie w żądaniach wiadomości wszystkich pól dostępnych w obiekcie message. Obejmuje to m.in.:
- wspólny zestaw pól, które mają być interpretowane przez wszystkie instancje aplikacji otrzymujące wiadomość.
- zestawy pól specyficzne dla platformy, np.
AndroidConfigiWebpushConfig, które są interpretowane tylko przez instancje aplikacji działające na określonej platformie.
Bloki specyficzne dla platformy zapewniają elastyczność w dostosowywaniu wiadomości do różnych platform, dzięki czemu są one prawidłowo obsługiwane po odebraniu. Backend FCM uwzględni wszystkie określone parametry i dostosuje wiadomość do każdej platformy.
Kiedy używać wspólnych pól
Używaj wspólnych pól, gdy:
- Kierowanie na instancje aplikacji na wszystkich platformach – Apple, Android i internet
- Wysyłanie wiadomości do tematów
Wszystkie instancje aplikacji, niezależnie od platformy, mogą interpretować te wspólne pola:
Kiedy używać pól specyficznych dla platformy
Używaj pól specyficznych dla platformy, jeśli chcesz:
- Wysyłanie pól tylko na określone platformy
- Wysyłanie pól specyficznych dla platformy oprócz pól wspólnych
Jeśli chcesz wysyłać wartości tylko na określone platformy, nie używaj pól wspólnych, tylko pól specyficznych dla platformy. Jeśli na przykład chcesz wysłać powiadomienie tylko na platformy Apple i do internetu, ale nie na Androida, musisz użyć 2 osobnych zestawów pól – jednego dla Apple i jednego dla internetu.
Jeśli wysyłasz wiadomości z określonymi opcjami dostarczania, użyj pól specyficznych dla platformy, aby je ustawić. W razie potrzeby możesz określić różne wartości dla poszczególnych platform. Nawet jeśli chcesz ustawić zasadniczo tę samą wartość na różnych platformach, musisz użyć pól specyficznych dla danej platformy. Dzieje się tak, ponieważ każda platforma może interpretować tę wartość nieco inaczej. Na przykład na Androidzie czas życia jest ustawiany jako czas wygaśnięcia w sekundach, a na urządzeniach Apple jako data wygaśnięcia.
Przykład: wiadomość z powiadomieniem z opcjami kolorów i ikon
Ten przykład żądania wysyłania wysyła wspólny tytuł i treść powiadomienia na wszystkie platformy, ale także niektóre zastąpienia specyficzne dla platformy na urządzenia z Androidem.
W przypadku Androida żądanie ustawia specjalną ikonę i kolor, które mają być wyświetlane na urządzeniach z Androidem. Jak wspomniano w informacjach o AndroidNotification, kolor jest podawany w formacie #rrggbb, a obraz musi być zasobem ikony do rysowania, który jest lokalny dla aplikacji na Androida.
Oto przybliżony efekt wizualny na urządzeniu użytkownika:
![]()
Node.js
const topicName = 'industry-tech';

const message = {
  notification: {
    title: '`$FooCorp` up 1.43% on the day',
    body: 'FooCorp gained 11.80 points to close at 835.67, up 1.43% on the day.'
  },
  android: {
    notification: {
      icon: 'stock_ticker_update',
      color: '#7e55c3'
    }
  },
  topic: topicName,
};

getMessaging().send(message)
  .then((response) => {
    // Response is a message ID string.
    console.log('Successfully sent message:', response);
  })
  .catch((error) => {
    console.log('Error sending message:', error);
  });
Java
Message message = Message.builder()
.setNotification(Notification.builder()
.setTitle("$GOOG up 1.43% on the day")
.setBody("$GOOG gained 11.80 points to close at 835.67, up 1.43% on the day.")
.build())
.setAndroidConfig(AndroidConfig.builder()
.setTtl(3600 * 1000)
.setNotification(AndroidNotification.builder()
.setIcon("stock_ticker_update")
.setColor("#f45342")
.build())
.build())
.setApnsConfig(ApnsConfig.builder()
.setAps(Aps.builder()
.setBadge(42)
.build())
.build())
.setTopic("industry-tech")
.build();
Python
message = messaging.Message(
notification=messaging.Notification(
title='$GOOG up 1.43% on the day',
body='$GOOG gained 11.80 points to close at 835.67, up 1.43% on the day.',
),
android=messaging.AndroidConfig(
ttl=datetime.timedelta(seconds=3600),
priority='normal',
notification=messaging.AndroidNotification(
icon='stock_ticker_update',
color='#f45342'
),
),
apns=messaging.APNSConfig(
payload=messaging.APNSPayload(
aps=messaging.Aps(badge=42),
),
),
topic='industry-tech',
)
Go
oneHour := time.Duration(1) * time.Hour
badge := 42
message := &messaging.Message{
Notification: &messaging.Notification{
Title: "$GOOG up 1.43% on the day",
Body: "$GOOG gained 11.80 points to close at 835.67, up 1.43% on the day.",
},
Android: &messaging.AndroidConfig{
TTL: &oneHour,
Notification: &messaging.AndroidNotification{
Icon: "stock_ticker_update",
Color: "#f45342",
},
},
APNS: &messaging.APNSConfig{
Payload: &messaging.APNSPayload{
Aps: &messaging.Aps{
Badge: &badge,
},
},
},
Topic: "industry-tech",
}
C#
var message = new Message
{
Notification = new Notification()
{
Title = "$GOOG up 1.43% on the day",
Body = "$GOOG gained 11.80 points to close at 835.67, up 1.43% on the day.",
},
Android = new AndroidConfig()
{
TimeToLive = TimeSpan.FromHours(1),
Notification = new AndroidNotification()
{
Icon = "stock_ticker_update",
Color = "#f45342",
},
},
Apns = new ApnsConfig()
{
Aps = new Aps()
{
Badge = 42,
},
},
Topic = "industry-tech",
};
REST
POST https://fcm.googleapis.com/v1/projects/myproject-b5ae1/messages:send HTTP/1.1

Content-Type: application/json
Authorization: Bearer ya29.ElqKBGN2Ri_Uz...HnS_uNreA
{
  "message":{
     "topic":"industry-tech",
     "notification":{
       "title":"`$FooCorp` up 1.43% on the day",
       "body":"FooCorp gained 11.80 points to close at 835.67, up 1.43% on the day."
     },
     "android":{
       "notification":{
         "icon":"stock_ticker_update",
         "color":"#7e55c3"
       }
     }
   }
 }
Szczegółowe informacje o kluczach dostępnych w blokach specyficznych dla platformy w treści wiadomości znajdziesz w dokumentacji referencyjnej HTTP w wersji 1.
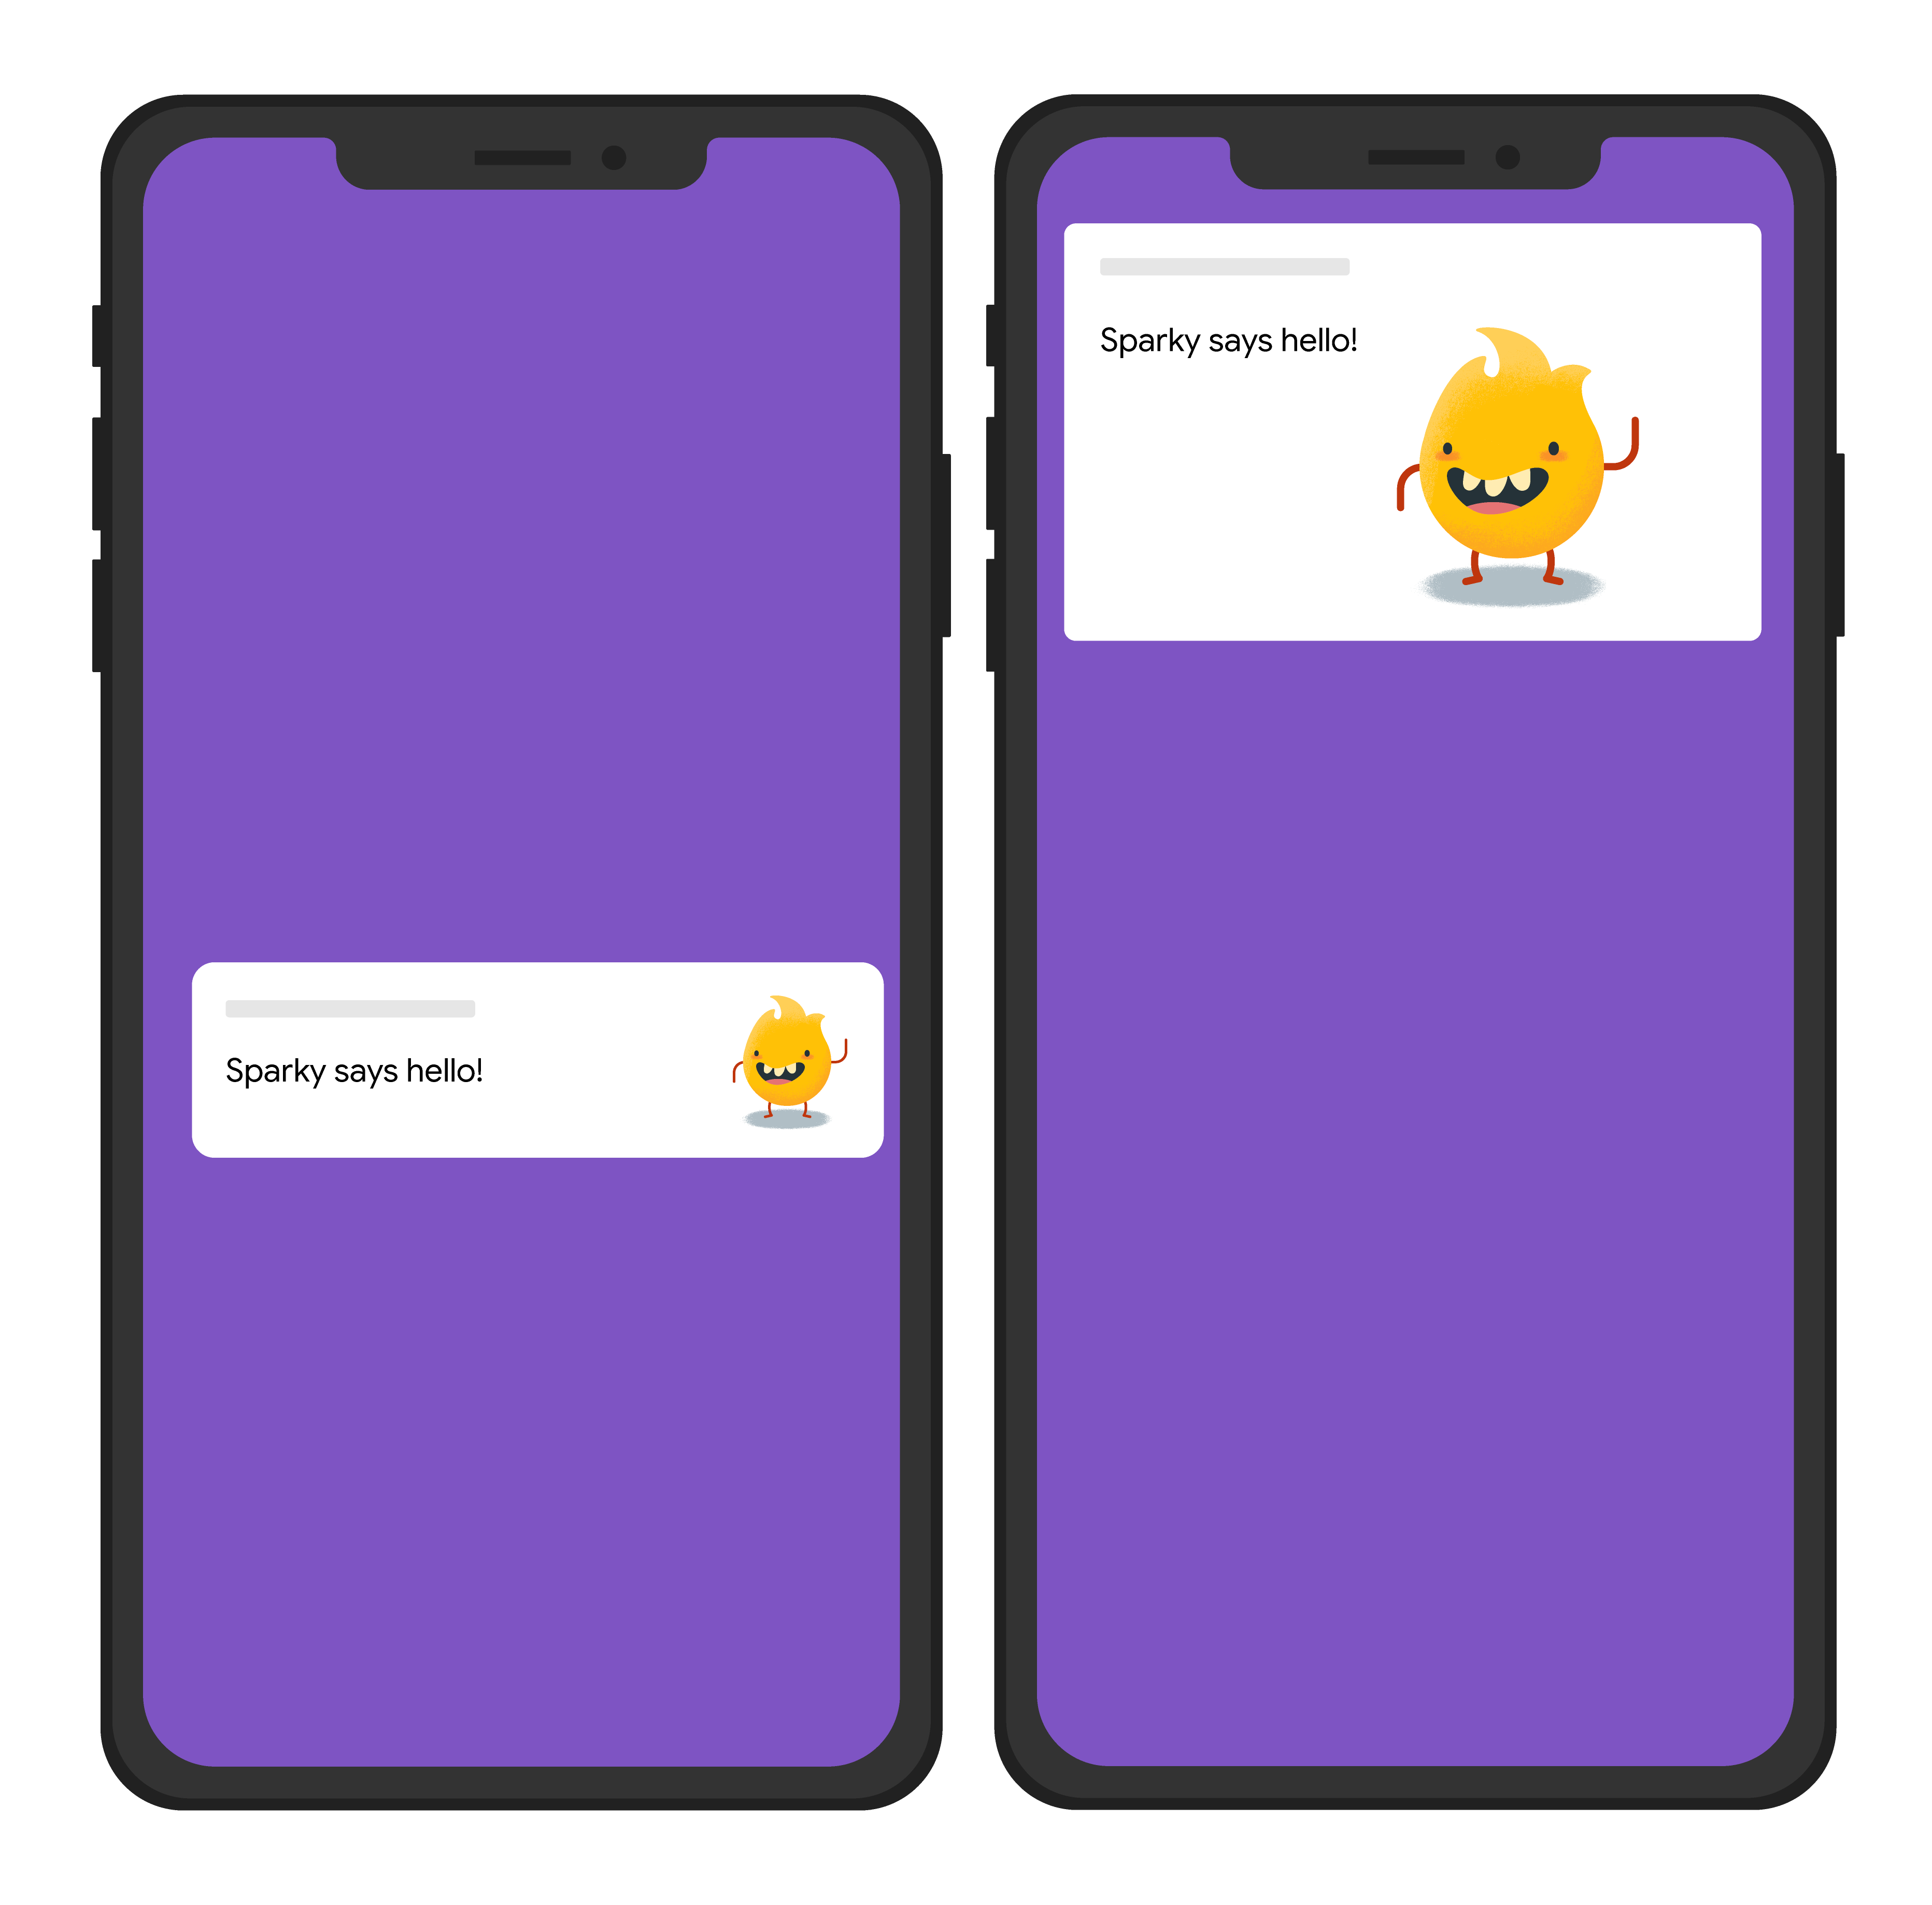
Przykład: wiadomość z powiadomieniem zawierająca obraz niestandardowy
W przykładzie poniżej żądanie wysyłania powiadomień wysyła wspólny tytuł powiadomienia na wszystkie platformy, ale wysyła też obraz. Oto przybliżony efekt wizualny na urządzeniu użytkownika:
Node.js
const topicName = 'industry-tech';

const message = {
  notification: {
    title: 'Sparky says hello!'
  },
  android: {
    notification: {
      imageUrl: 'https://foo.bar.pizza-monster.png'
    }
  },
  apns: {
    payload: {
      aps: {
        'mutable-content': 1
      }
    },
    fcm_options: {
      image: 'https://foo.bar.pizza-monster.png'
    }
  },
  webpush: {
    headers: {
      image: 'https://foo.bar.pizza-monster.png'
    }
  },
  topic: topicName,
};

getMessaging().send(message)
  .then((response) => {
    // Response is a message ID string.
    console.log('Successfully sent message:', response);
  })
  .catch((error) => {
    console.log('Error sending message:', error);
  });
REST
POST https://fcm.googleapis.com/v1/projects/myproject-b5ae1/messages:send HTTP/1.1

Content-Type: application/json
Authorization: Bearer ya29.ElqKBGN2Ri_Uz...HnS_uNreA
{
  "message":{
     "topic":"industry-tech",
     "notification":{
       "title":"Sparky says hello!",
     },
     "android":{
       "notification":{
         "image":"https://foo.bar/pizza-monster.png"
       }
     },
     "apns":{
       "payload":{
         "aps":{
           "mutable-content":1
         }
       },
       "fcm_options": {
           "image":"https://foo.bar/pizza-monster.png"
       }
     },
     "webpush":{
       "headers":{
         "image":"https://foo.bar/pizza-monster.png"
       }
     }
   }
 }
Szczegółowe informacje o kluczach dostępnych w blokach specyficznych dla platformy w treści wiadomości znajdziesz w dokumentacji referencyjnej HTTP w wersji 1.
Przykład: wiadomość z powiadomieniem i powiązanym działaniem kliknięcia
Ten przykładowy komunikat żądania wysyła wspólny tytuł powiadomienia na wszystkie platformy, ale wysyła też działanie, które aplikacja ma wykonać w odpowiedzi na interakcję użytkownika z powiadomieniem. Oto przybliżony efekt wizualny na urządzeniu użytkownika:

Node.js
const topicName = 'industry-tech';

const message = {
  notification: {
    title: 'Breaking News....'
  },
  android: {
    notification: {
      clickAction: 'news_intent'
    }
  },
  apns: {
    payload: {
      aps: {
        'category': 'INVITE_CATEGORY'
      }
    }
  },
  webpush: {
    fcmOptions: {
      link: 'breakingnews.html'
    }
  },
  topic: topicName,
};

getMessaging().send(message)
  .then((response) => {
    // Response is a message ID string.
    console.log('Successfully sent message:', response);
  })
  .catch((error) => {
    console.log('Error sending message:', error);
  });
REST
POST https://fcm.googleapis.com/v1/projects/myproject-b5ae1/messages:send HTTP/1.1

Content-Type: application/json
Authorization: Bearer ya29.ElqKBGN2Ri_Uz...HnS_uNreA
{
  "message":{
     "topic":"industry-tech",
     "notification":{
       "title":"Breaking News...",
     },
     "android":{
       "notification":{
         "click_action":"news_intent"
       }
     },
     "apns":{
       "payload":{
         "aps":{
           "category" : "INVITE_CATEGORY"
         }
       },
     },
     "webpush":{
       "fcm_options":{
         "link":"breakingnews.html"
       }
     }
   }
 }
Szczegółowe informacje o kluczach dostępnych w blokach specyficznych dla platformy w treści wiadomości znajdziesz w dokumentacji referencyjnej HTTP w wersji 1.
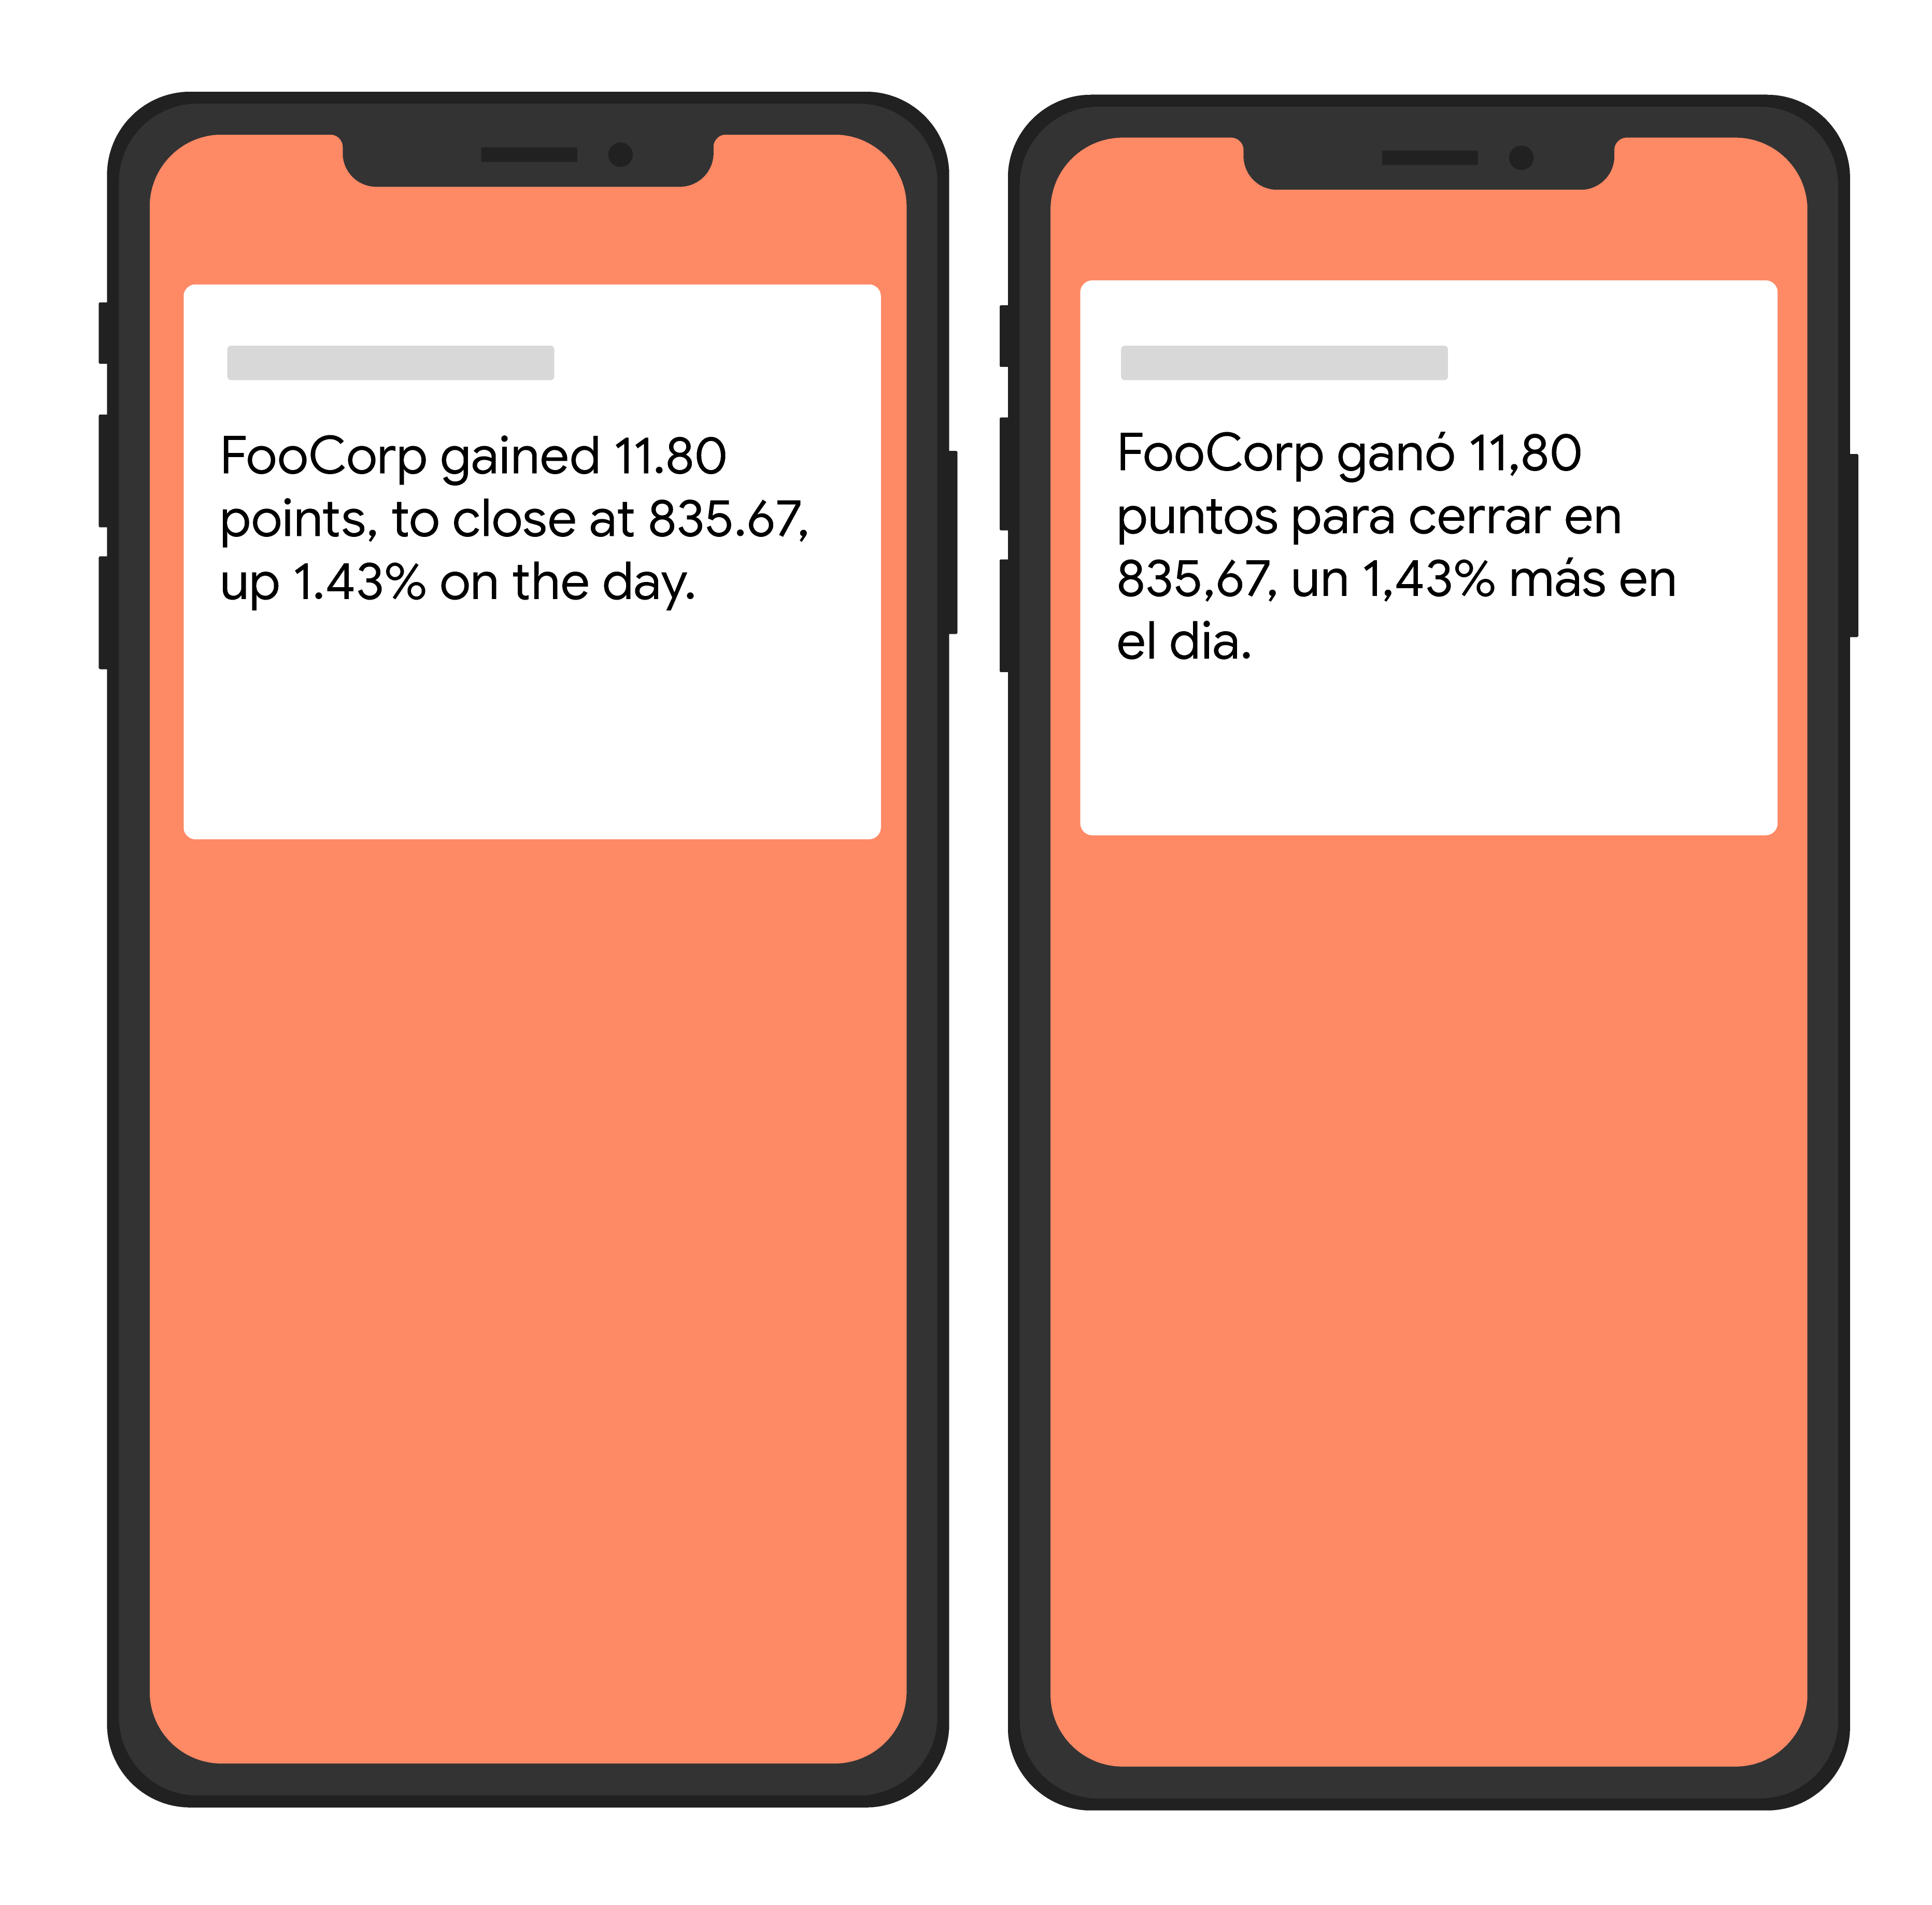
Przykład: wiadomość z powiadomieniem z opcjami lokalizacji
Ten przykładowy kod wysyła do klienta żądanie z opcjami lokalizacji, aby wyświetlać przetłumaczone wiadomości. Oto przybliżony efekt wizualny na urządzeniu użytkownika:
Node.js
var topicName = 'industry-tech';

var message = {
  android: {
    ttl: 3600000,
    notification: {
      bodyLocKey: 'STOCK_NOTIFICATION_BODY',
      bodyLocArgs: ['FooCorp', '11.80', '835.67', '1.43']
    }
  },
  apns: {
    payload: {
      aps: {
        alert: {
          locKey: 'STOCK_NOTIFICATION_BODY',
          locArgs: ['FooCorp', '11.80', '835.67', '1.43']
        }
      }
    }
  },
  topic: topicName,
};

getMessaging().send(message)
  .then((response) => {
    // Response is a message ID string.
    console.log('Successfully sent message:', response);
  })
  .catch((error) => {
    console.log('Error sending message:', error);
  });
REST
POST https://fcm.googleapis.com/v1/projects/myproject-b5ae1/messages:send HTTP/1.1

Content-Type: application/json
Authorization: Bearer ya29.ElqKBGN2Ri_Uz...HnS_uNreA
{
  "message":{
             "topic":"Tech",
             "android":{
               "ttl":"3600s",
               "notification":{
                 "body_loc_key": "STOCK_NOTIFICATION_BODY",
                 "body_loc_args":  ["FooCorp", "11.80", "835.67", "1.43"],
               },
             },
             "apns":{
               "payload":{
                 "aps":{
                   "alert" : {
                     "loc-key": "STOCK_NOTIFICATION_BODY",
                     "loc-args":  ["FooCorp", "11.80", "835.67", "1.43"],
                    },
                 },
               },
             },
  },
}'
Szczegółowe informacje o kluczach dostępnych w blokach specyficznych dla platformy w treści wiadomości znajdziesz w dokumentacji referencyjnej HTTP w wersji 1.