
Firebase can send a variety of default Crashlytics alerts (see the alerting overview page). Firebase offers basic alerting integrations to send the default Crashlytics alerts to Slack, Jira, and PagerDuty.
At a high-level, here's how to set up and configure these integrations in the Firebase console:
Follow the guided workflow for each alerting service in the
Settings > Integrations page of the Firebase console.Select which configuration is used for individual apps and configure the destination of other alerts in the Crashlytics card of the
Settings > Alerts page of the Firebase console.
The rest of this page describes in detail how to set up each basic alerting integration.
Slack: Set up integration with Slack
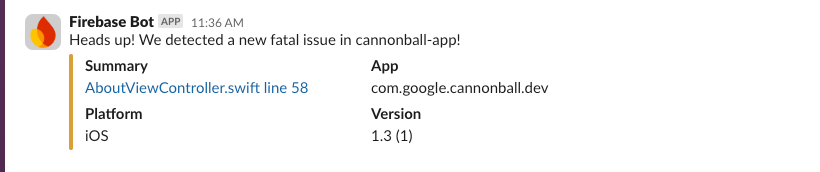
After setting up the Firebase integration with Slack, your project can post to your Slack workspace in response to events reported by Crashlytics, like new, regressed, or increasing-velocity issues.
Step 1: Set up a Slack webhook
Before you set up the integration in Firebase, you need to add an incoming webhook in Slack to handle communications from Firebase.
To learn how to do this, read the Slack documentation about Sending messages using Incoming Webhooks.
Step 2: Set up the Slack integration in the Firebase console
After you've set up the appropriate webhook, you're ready to set up the integration for Crashlytics:
In the Firebase console, go to the
Settings > Integrations page.On the Slack integration card, click Install.
Set up the integration by setting values in the following fields:
Webhook URL: Paste the webhook URL from your Slack settings page.
Default channel: Enter a channel name. You can override this default later on a per-app or per-alert basis.
Name of posting user: Enter a name to send the messages under.
Click Verify & save.
After verifying and saving the Slack integration, you should see a confirmation message in the default channel you selected.
Step 3: Configure alert settings for Slack
You can configure alerts by app and event type. For example, you can turn off
alerts in your testing app or route high-priority alerts in your production app
to an #urgent channel.
Event types
The Firebase integration with Slack lets you send alerts in response to the following event types:
New fatal issues: triggered when your app experiences a crash or ANR that Crashlytics hasn't seen before.
New non-fatal issues: triggered when your app experiences a non-fatal issue Crashlytics hasn't seen before.
Regressed issues: triggered when your app experiences a crash that you'd previously marked closed.
Trending issues: triggered when an issue is emerging or trending.
Increasing-velocity issues: triggered when a single crash or ANR type impacts a percentage of users in a 30-minute period for a given app version.
Configure settings for each app
Here's how to configure alerts for each app in your Firebase project:
In the Firebase console, go to the
Settings > Alerts page.Go to the Crashlytics alerts card. Select the app you want to configure from the drop-down menu.
Select the Slack channel where you want to send alerts for this app.
For each type of alert, select from the drop-down whether you want to send that type of alert to Slack.
Repeat these steps for each app that you want to configure.
That's it! Firebase will send alerts to your specified Slack channels if your apps have new, regressed, or increasing-velocity issues.
Jira: Set up integration with Jira
After setting up the Firebase integration with Jira, your Firebase project can post to a Jira project in response to events reported by Crashlytics, like new, regressed, or increasing-velocity issues. You can also link individual Crashlytics issues to Jira issues.
Step 1: Prepare Jira for integration with Firebase
Create an API token (Jira Cloud only)
Before you set up the integration in Firebase, you need to generate an API token in Jira Cloud.
In the Jira console, open the API tokens settings.
Click Create API token.
Save this API token somewhere secure, as you'll need it later.
Create a "Bug" issue type
The Firebase integration with Jira creates issues with the type Bug. You
need to create this issue type in your Jira project (if it doesn't already
exist).
In the Jira console, navigate to Project Settings.
Click Issue types.
Click Add issue type.
Select "Bug", or enter it manually.
Step 2: Set up the Jira integration in the Firebase console
Set up your Jira integration for Jira Cloud or for Jira Server.
Jira Cloud
In the Firebase console, go to the
Settings > Integrations page.On the Jira integration card, click Install.
Click Set up Jira integration.
Enter your Jira project URL in the following format:
https://WORKSPACE_NAME.atlassian.net/projects/PROJECT_KEYEnter your Jira login email and your API token.
Click Verify & save.
Jira Server
In the Firebase console, go to the
Settings > Integrations page.On the Jira integration card, click Install.
Click Set up Jira integration.
Enter your Jira project URL in the following format:
https://SERVER_NAME.com/projects/PROJECT_KEYEnter your Jira login email and your API token.
Click Verify & save.
Step 3: Configure alert settings for Jira
You can configure alerts by app and event type. For example, you can turn off alerts in your testing app or route alerts about different apps to different Jira projects.
Event types
The Firebase integration with Jira lets you send alerts in response to the following event types:
New fatal issues: triggered when your app experiences a crash or ANR that Crashlytics hasn't seen before.
New non-fatal issues: triggered when your app experiences a non-fatal issue Crashlytics hasn't seen before.
Regressed issues: triggered when your app experiences a crash that you'd previously marked closed.
Trending issues: triggered when an issue is emerging or trending.
Increasing-velocity issues: triggered when a single crash or ANR type impacts a percentage of users in a 30-minute period for a given app version.
Configure settings for each app
Here's how to configure alerts for each app in your Firebase project:
In the Firebase console, go to the
Settings > Alerts page.Go to the Crashlytics alerts card. Select the app you want to configure from the drop-down menu.
Select the Jira project where you want to send alerts for this app.
For each type of alert, select from the drop-down whether you want to send that type of alert to Jira.
Repeat these steps for each app that you want to configure.
That's it! Firebase will send alerts to your specified Jira projects if your apps have new, regressed, or increasing-velocity issues.
(Optional) Link Crashlytics issues and Jira issues
In addition to the automatically-created Jira issues that Firebase creates, it's possible to link your Crashlytics issues to existing Jira issues. You can also create a new Jira issue from the Firebase console. You'll need to enable the Jira integration before using this feature.
Navigate to the Crashlytics issue you'd like to link to a Jira issue.
Click Link to Jira.
Either click Create issue in Project, or paste your Jira issue URL or issue key in the provided field.
Unlink a Crashlytics issue from a Jira issue
Navigate to the Crashlytics issue you'd like to unlink from Jira.
Click Linked Issue.
Click More, and select Unlink.
PagerDuty: Set up integration with PagerDuty
After setting up the Firebase integration with PagerDuty, your Firebase project lets PagerDuty page your on-call responders in response to events reported by Crashlytics, like new, regressed, or increasing-velocity issues.
Step 1: Set up the PagerDuty integration in the Firebase console
In the Firebase console, go to the
Settings > Integrations page.On the PagerDuty integration card, click Install.
Follow the on-screen instructions to set up the integration.
Click Verify & save.
Step 2: Configure alert settings for PagerDuty
You can configure alerts by app and event type. For example, you can turn off alerts in your testing app or route alerts about different apps to different PagerDuty projects.
Event types
The Firebase integration with PagerDuty lets you send alerts in response to the following event types:
New fatal issues: triggered when your app experiences a crash or ANR that Crashlytics hasn't seen before.
New non-fatal issues: triggered when your app experiences a non-fatal issue Crashlytics hasn't seen before.
Regressed issues: triggered when your app experiences a crash that you'd previously marked closed.
Trending issues: triggered when an issue is emerging or trending.
Increasing-velocity issues: triggered when a single crash or ANR type impacts a percentage of users in a 30-minute period for a given app version.
Configure settings for each app
Here's how to configure alerts for each app in your Firebase project:
In the Firebase console, go to the
Settings > Alerts page.Go to the Crashlytics alerts card. Select the app you want to configure from the drop-down menu.
Select the PagerDuty service where you want to send alerts for this app.
For each type of alert, select from the drop-down whether you want to send that type of alert to PagerDuty.
Repeat these steps for each app that you want to configure.
That's it! Firebase will post bugs to your specified PagerDuty service if your apps have new, regressed, or increasing-velocity issues.